• After 15+ years, we've made a big change: Android Forums is now Early Bird Club. Learn more here.

Root [ROOT GUIDE] Stock-2-Cyanogen / Update ROM


REMEMBER YOU BRICKED YOUR PHONE, NOT ME!
I AM NOT RESPONSIBLE FOR WHAT YOU DO WITH THIS INFORMATION.


ROGERS PHONES ARE ROOTED IN A DIFFERENT WAY
PLEASE FOLLOW THE ROGERS ROOT GUIDE


UPDATED 10/07/09 Installing CM 4.1.999
UPDATED 10/18/09 Installing CM 4.1.9999
UPDATED 10/25/09 Installing CM 4.2.1
UPDATED 10/28/09 Installing CM 4.2.2
UPDATED 10/31/09 Installing CM 4.2.3.1

Required Materials:
G1 / Dream
Micro SD card reader (phone will work in MOST cases)
Computer with Internet connection
USB cable for phone
Data Plan
_________________________________________________

Format your SD card using the FAT32 Filesystem:
1) Connect your sdcard to the computer using a card reader
2) A new removable disk should show up on your computer.
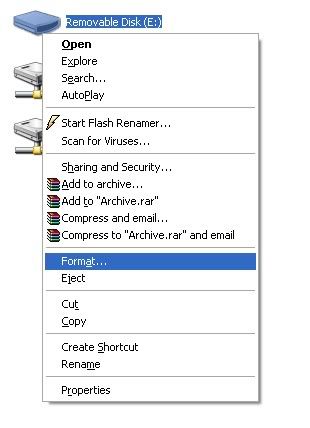
3) Right click it and select Format
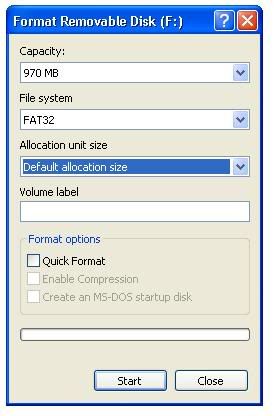
4) Select FAT32 as the file system type.
5) Click the Start button
IMG1.jpg
IMG2.jpg


Download Everything Here
FILE 1 Download and unzip the RC29 or RC7 image file. Copy the DREAMIMG.nbh file to the SD card. (RC29 for US, RC7 is for UK)
FILE 2 Download cm-recovery-1.4.img and copy it to your SD card
FILE 3 Download the Hard SPL and copy the zip file to the SD card.
FILE 4 Download the "1.6 Recovery Image" for your Dream/G1/ADP1 or for your Magic/ION/MT3G (This is NOT a recovery image, it is a ROM that you can flash from recovery)
FILE 5 READ THE FIRST POST and download the latest Cyanogen stable ROM then copy it to your SD card


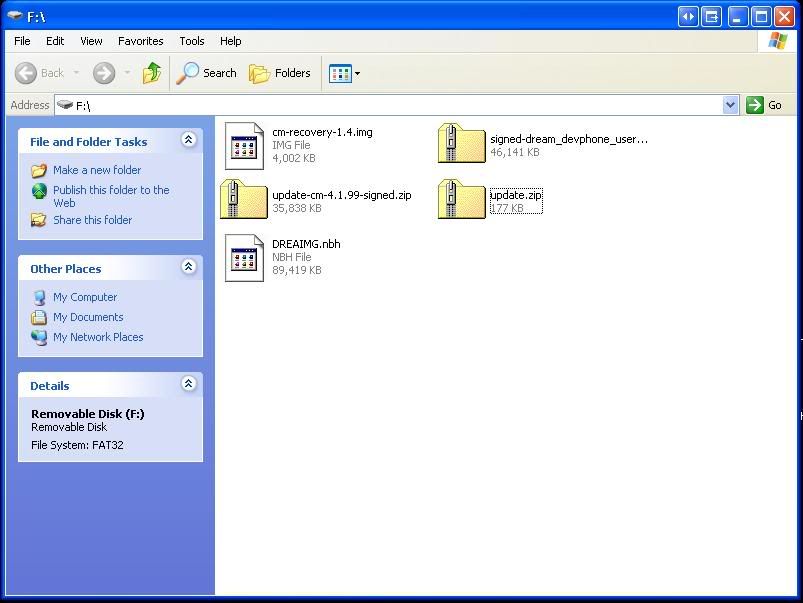
Your SD card should look like this: (NOTE: File 5 should be 4.2.3.1)
IMG3B.jpg


STEP 1: DOWNGRADE
Our first step is going to downgrade your phone to RC29, This is like removing Windows XP Service Pack 3 and installing Windows XP Service Pack 1. It allows us to use a security flaw to gain root access. This section is going to use FILE 1 from the downloads
1) Turn the device power off.
2) Hold Camera button, and press Power button to enter bootloader mode.
3) You should see a gray/white screen with instructions to flash your phone with the update on your SD card.
4) As per the on-screen instructions, press the Power button to start upgrade procedure. DO NOT INTERRUPT THIS PROCESS.
5) After it is finished, perform the restart your phone. (May take up to 15 minutes to boot)
6) Complete the setup process for gmail.


STEP 2: ROOT
Your phone is now downgraded and we can use the security flaw to replace the recovery image. The "recovery" is kinda like a boot disk on your computer, we use this to delete, modify, and create system files while they are not in use my the ROM. The recovery will be used when ever you flash pretty much anything to your phone.This section is going to use FILE 2 from the downloads
1) At the home screen hit the enter key twice, type "telnetd" and press enter. IGNORE WHAT THE SCREEN IS DOING
2) Press Home
3) Goto the market and download "Telnet"
4) Open Telnet and connect to localhost : 23

5) Press enter and you should see a #
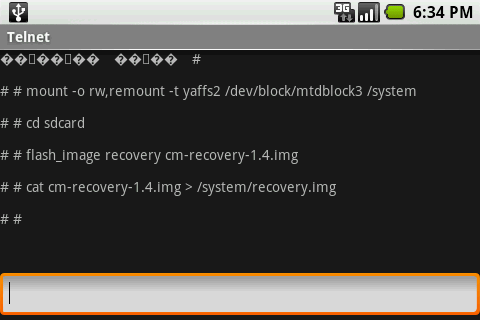
6) Now type the following and press enter at the end of each line

mount -o rw,remount -t yaffs2 /dev/block/mtdblock3 /system
cd sdcard
flash_image recovery cm-recovery-1.4.img
cat cm-recovery-1.4.img > /system/recovery.img

7) Press the home button
IMG4.jpg
IMG10.png


STEP 3: HardSPL
Now we are going to change the bootloader or "SPL". Currently your SPL will only allow you to flash ROMs that HTC or your carrier have produced. This new "HardSPL" will allow us to flash ANY ROM we want. This section is going to use FILE 3 from the downloads
1) Hold power and turn the phone off
2) Start up in recovery mode by holding home and pressing power.
3) You will now enter recovery mode.
4) Press Alt-S to apply the update.zip from the SD card. This is the spl you downloaded.
5) After the update is complete, hold Home and press Back to restart. (May take up to 15 minutes to boot)


STEP 4: ROM
Now we are going to flash the latest ROM from Cyanogen. This is your new "Operating System". This section is going to use FILE 4 and FILE 5 from the downloads
1) Hold power and turn the phone off
2) Start up in recovery mode by holding home and pressing power.
3) You are now in recovery mode.
4) Press Alt-W to wipe all data
5) Press Alt-A to apply any zip from sd
6) Choose signed-dream_devphone_userdebug-ota-14721.zip (You won't see the entire filename)
7) When it is done it will ask you to reboot to complete the installation. Press Home+Back
8) You will be returned to the recovery screen in a few minutes, be patient.
9) Press Alt-A to apply any zip from sd
10) Choose update-cm-4.2.3.1-signed.zip
11) After the update is complete, hold Home and press Back to restart. (May take up to 15 minutes to boot)
12) Complete the setup process


You can NOT run HERO ROMs YET!!!!!!!
BACKUP FREQUENTLY
Remember that your nanddroid backups are on your SD card so be sure to save them if you do any partitioning.
 
Upgrading from CM4.1.11.1 or below to 4.2.3.1

Download File 4 and File 5 from first post above.

1) Hold power and turn the phone off
2) Start up in recovery mode by holding home and pressing power.
3) You are now in recovery mode.
4) Press Alt-W to wipe all data
5) Press Alt-A to apply any zip from sd
6) Choose signed-dream_devphone_userdebug-ota-14721.zip (You won't see the entire filename)
7) When it is done it will ask you to reboot to complete the installation. Press Home+Back
8) You will be returned to the recovery screen in a few minutes, be patient.
9) Press Alt-A to apply any zip from sd
10) Choose update-cm-4.2.3.1-signed.zip
11) After the update is complete, hold Home and press Back to restart. (May take up to 15 minutes to boot)
12) Complete the setup process


Upgrading from CM4.1.99 or higher to CM4.2.3.1

Download File 5 from first post above.

1) Hold power and turn the phone off
2) Start up in recovery mode by holding home and pressing power.
3) You are now in recovery mode.
4) Press Alt-B to run a nandroid backup
5) Press Alt-A to apply any zip from sd
6) Choose update-cm-4.2.3.1-signed.zip
7) After the update is complete, hold Home and press Back to restart. (May take up to 15 minutes to boot)
 
Exceptionally clear instructions thanks a lot for taking the time to make all this available to us mere mortals!

I'm on CM 4.0.4 at the moment so does any of this apply to me, or will I end up with non of the Google apps? :confused:
 
LOVE the fact you have used pictures in this guide. Now to convince you to do this for the Magic/MyTouch 32A and 32B...
 
If you have cm 4.0.4 you want to follow the instructions in the top of post 2. you wont loose the google apps. when you install the ADP 1.6 it has the google apps, dont reboot just flash cm 4.2.1 after that. the new cm roms copy the existing google apps into the cm rom so cm cant get in trouble for distributing the apps.
 
Hello fellow Wrecker. Everyone this is Fingerlickin, the most knowledgeable member here (most likely). He comes from the scary world of XDA and if you all are nice to him hopefully he will stay.
 
I'm still not taking off my pants codani....

Wreckers,
I'm going to revive the utility script for recovery and I'm working on the commander app for terminal commands again. Any last requests for options?

Phandroidians,
I have a script that is menu based and will perform all of the common fuctions in the recovery console like formatting the sdcard and upgrading from ext3 to ext4. The commander app I'm working on will perform common terminal commands like removing amazon mp3 app and clearing dalvik-cache. Look for these two to be in post 3 soon.
 
Darn, I thought I really buttered you up with that one!

I don't have any real requests for it at this point, getting the Droid any day now so I won't be able to use it. I still have to get a hold of everyone else and see if they will join up over here. I hope they do cuz this forum seems really good to me, just needs some more experienced members.
 
Hello fellow Wrecker. Everyone this is Fingerlickin, the most knowledgeable member here (most likely). He comes from the scary world of XDA and if you all are nice to him hopefully he will stay.
i would like to say hello to you 2....if they call you the Fingerlickin,can i be call "The App Man"
 
Help!!! When I get to step 2 and enter the last line in telnet, it starts with "cat" it says it's in read only mode and it won't work!!!! please, please help.
 
Excellent.......... i have successfully upgraded from CM4.1.99 to CM4.2.3.1

Is it ok to delete the older file from my phone ie CM4.1.99?

would it affect my phone?
 
Excellent.......... i have successfully upgraded from CM4.1.99 to CM4.2.3.1

Is it ok to delete the older file from my phone ie CM4.1.99?

would it affect my phone?

No it will not affect it ... the only reason to keep it is for easy access should you want to revert ....

At the least you can move it off the phone to your PC...
 
Ok I have two stupid questions. One, I am running a rooted g1 with jesusfrekes 1.5 cupcake rom. Is it possible and simple to update the rom to cyanogen. Question 2 is the latest cyanogen update andriod 1.6 or 2.0? I am trying to see if I can get 2.0 on my phone
 
Am trying to run my apps from the SD but its not working out for me.
Am finding it hard to do the partitioning for the apps2sd.

Could you guys pls do the same pictorial illustration for this as well with step by step instructoions ...would be eternally grateful
 
Unfortunely the guys who made this guide have actually made their own site and have been pretty much have been covering that, I am unable to post the name of another site plus it would be considered spam but it does have the word overdrive in it.

Easiest option is to get yourself a copy of amon ra's 1.3.2 recovery and file the instruction above for the cm recovery. Amon's recovery features a way to just auto partition in the menu
 
So I downloaded all the files above and went to step one. Phone loaded the image and checked it, bar filled up and then it said FAILED. Incorrect image or something.

In the blue part at the top of the HBOOT menu thing it says:

DREAM PVT 32B SHIP S-ON d
HBOOT-1.33.0010 (DREA20000)

Does this mean it's a Rogers?
 
model number T-mobile G1
firmware 1.6
base band 62.50S.20.17H_2.22.19.26I
kernel version2.6.29-00479-g3c7df37
android-build@apa26 #19
build numberDRC83
im having a problem with the formatting it dismounts when I click on the format dont know what to do. It seems like everyone here knows what they are doing thanks
 
Thanks for the guide, was really useful and now have a rooted G1. Had a few scary moments with the telnet part but alas all is now working. Happy New Year!
 
Just bricked my G1 using this guide - halts at G1 startup screen, won't respond to HOME+END or Camera+END boot, adb doesn't pick up the device when I'm plugged in. Any suggestions other than paperweight?

Thanks
 

REMEMBER YOU BRICKED YOUR PHONE, NOT ME!
I AM NOT RESPONSIBLE FOR WHAT YOU DO WITH THIS INFORMATION.


ROGERS PHONES ARE ROOTED IN A DIFFERENT WAY
PLEASE FOLLOW THE ROGERS ROOT GUIDE


UPDATED 10/07/09 Installing CM 4.1.999
UPDATED 10/18/09 Installing CM 4.1.9999
UPDATED 10/25/09 Installing CM 4.2.1
UPDATED 10/28/09 Installing CM 4.2.2
UPDATED 10/31/09 Installing CM 4.2.3.1

Required Materials:
G1 / Dream
Micro SD card reader (phone will work in MOST cases)
Computer with Internet connection
USB cable for phone
Data Plan
_________________________________________________

Format your SD card using the FAT32 Filesystem:
1) Connect your sdcard to the computer using a card reader
2) A new removable disk should show up on your computer.
3) Right click it and select Format
4) Select FAT32 as the file system type.
5) Click the Start button
IMG1.jpg
IMG2.jpg


Download Everything Here
FILE 1 Download and unzip the RC29 or RC7 image file. Copy the DREAMIMG.nbh file to the SD card. (RC29 for US, RC7 is for UK)
FILE 2 Download cm-recovery-1.4.img and copy it to your SD card
FILE 3 Download the Hard SPL and copy the zip file to the SD card.
FILE 4 Download the "1.6 Recovery Image" for your Dream/G1/ADP1 or for your Magic/ION/MT3G (This is NOT a recovery image, it is a ROM that you can flash from recovery)
FILE 5 READ THE FIRST POST and download the latest Cyanogen stable ROM then copy it to your SD card


Your SD card should look like this: (NOTE: File 5 should be 4.2.3.1)
IMG3B.jpg


STEP 1: DOWNGRADE
Our first step is going to downgrade your phone to RC29, This is like removing Windows XP Service Pack 3 and installing Windows XP Service Pack 1. It allows us to use a security flaw to gain root access. This section is going to use FILE 1 from the downloads
1) Turn the device power off.
2) Hold Camera button, and press Power button to enter bootloader mode.
3) You should see a gray/white screen with instructions to flash your phone with the update on your SD card.
4) As per the on-screen instructions, press the Power button to start upgrade procedure. DO NOT INTERRUPT THIS PROCESS.
5) After it is finished, perform the restart your phone. (May take up to 15 minutes to boot)
6) Complete the setup process for gmail.


STEP 2: ROOT
Your phone is now downgraded and we can use the security flaw to replace the recovery image. The "recovery" is kinda like a boot disk on your computer, we use this to delete, modify, and create system files while they are not in use my the ROM. The recovery will be used when ever you flash pretty much anything to your phone.This section is going to use FILE 2 from the downloads
1) At the home screen hit the enter key twice, type "telnetd" and press enter. IGNORE WHAT THE SCREEN IS DOING
2) Press Home
3) Goto the market and download "Telnet"
4) Open Telnet and connect to localhost : 23

5) Press enter and you should see a #
6) Now type the following and press enter at the end of each line

mount -o rw,remount -t yaffs2 /dev/block/mtdblock3 /system
cd sdcard
flash_image recovery cm-recovery-1.4.img
cat cm-recovery-1.4.img > /system/recovery.img

7) Press the home button
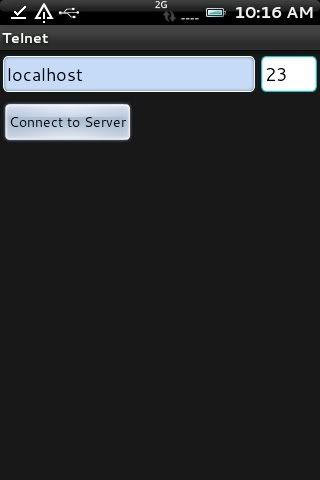
IMG4.jpg
IMG10.png


STEP 3: HardSPL
Now we are going to change the bootloader or "SPL". Currently your SPL will only allow you to flash ROMs that HTC or your carrier have produced. This new "HardSPL" will allow us to flash ANY ROM we want. This section is going to use FILE 3 from the downloads
1) Hold power and turn the phone off
2) Start up in recovery mode by holding home and pressing power.
3) You will now enter recovery mode.
4) Press Alt-S to apply the update.zip from the SD card. This is the spl you downloaded.
5) After the update is complete, hold Home and press Back to restart. (May take up to 15 minutes to boot)


STEP 4: ROM
Now we are going to flash the latest ROM from Cyanogen. This is your new "Operating System". This section is going to use FILE 4 and FILE 5 from the downloads
1) Hold power and turn the phone off
2) Start up in recovery mode by holding home and pressing power.
3) You are now in recovery mode.
4) Press Alt-W to wipe all data
5) Press Alt-A to apply any zip from sd
6) Choose signed-dream_devphone_userdebug-ota-14721.zip (You won't see the entire filename)
7) When it is done it will ask you to reboot to complete the installation. Press Home+Back
8) You will be returned to the recovery screen in a few minutes, be patient.
9) Press Alt-A to apply any zip from sd
10) Choose update-cm-4.2.3.1-signed.zip
11) After the update is complete, hold Home and press Back to restart. (May take up to 15 minutes to boot)
12) Complete the setup process


You can NOT run HERO ROMs YET!!!!!!!
BACKUP FREQUENTLY
Remember that your nanddroid backups are on your SD card so be sure to save them if you do any partitioning.

Please note that this Guide may or may not be supported any longer on this site ... there is a post in this thread referring to it being maintained on another site...

So please use caution when/if you decide to use this guide... you might PM the author in post #1 of this thread.

http://androidforums.com/t-mobile-g1/12637-root-guide-stock-2-cyanogen-update-rom.html#post72380

 
when i try to go to step 3 and try to go into recovery mode it brings me back to the rainbow colored screen what can i do?
 
Back
Top Bottom