Artine
Android Expert
.
GUIDE
ClockWorkMod is a custom recovery for your phone - in our case, the LG Optimus Elite. It allows one to do many things with your device, the most notable being a Nandroid Backup, and allowing you to install a custom ROM (Read Only Memory, which in this context means a custom edition of the software that your phone runs). It also provides the basic recovery options such as a factory reset to return your phone to how it was fresh out of the box, also known as "Vanilla," or "Stock."
Required
Method #1: giantpune's Noob Installer
Method #2: Advanced Install
Method #1: The Extended Power Menu
If you're on a ROM for the Optimus Elite with this feature, you can reboot into recovery simply by holding down the power button until the power menu comes up, then tapping on "Recovery," and then "Ok."
Method #2: The app way
Method #3: Via ADB
Through the terminal/terminal emulator, enter the following:
Method #4: Old School
If your Optimus Elite is currently powered on, power it off. Turn it back on by holding down the power button. Before, or while, it is powering on, hold down the Volume Down (-) button/bottom part of the volume rocker until the phone enters ClockWorkMod, depicted below:
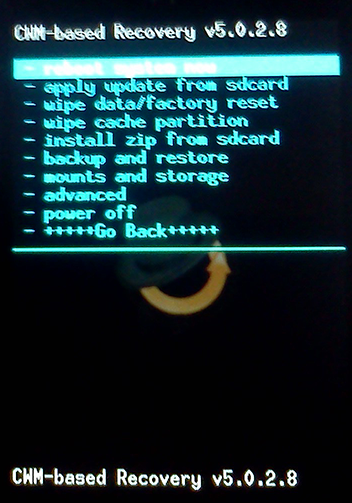
Image courtesy of MacFett. Resized.
Section 2.2
How Do I Update CWM?
Follow the same steps you did when installing CWM, but this time with the updated .bin file provided above, along with the appropriate changes to step 4 and 5, to overwrite your now old installation of CWM with the new one, and you're good to go.
This is where it gets fun, and where we'll get to the exciting part of CWM: Nandroid backups and custom ROMs. How to flash them with CWM, and flying away from stock on the wings of Angel - well, if CWM had wings. And if CWM was an Angel. You get the idea. Although it does have a snazzy top hat. But first things first....
You can navigate the entries in the menu by using the following:
And here we begin our complete feature tour. Get ready; it's kind of lengthy.
Main Menu
A custom ROM is a customized, or personalized, version of the Android device's Operating System, built by Developers (occasionally known as Chefs). There are nigh-innumerable advantages to having a custom ROM, and some of the most frequently seen benefits include, but are not limited to; greater battery life/longevity, less bloatware (junk apps that manufacturers add to the phone that no one uses, and slows the phone down), greater speed, a custom theme or look, etc.
There are multiple threads on this Optimus Elite board where you can acquire a custom (or stock) ROM. Here is the full list of all of the currently available ROMs for the Elite, in alphabetical order:
Build Your Own ROM:
Custom ROMs:
"A reference for the rest of us!"
------------------------------------------------------------------------------------------------------------
What's new? - April 26th, 2013
------------------------------------------------------------------------------------------------------------
------------------------------------------------------------------------------------------------------------
What's new? - April 26th, 2013
------------------------------------------------------------------------------------------------------------
- aa. Added mirror link to the CWM.bin file. Courtesy of phenomx4.
- ab. Updated the current ROM list.
- zz. Various and miscellaneous formatting, syntax, semantics, and background changes. There are too many of these, and are too often done, to list.
------------------------------------------------------------------------------------------------------------
Disclaimer / Warning
------------------------------------------------------------------------------------------------------------
This is only the FAQ/Compilation Guide for CWM for the OE. The main ClockWorkMod thread is found here. Please keep general discussion there, but feel free to ask questions both here and there.
You are the only person responsible if you brick your phone to any degree.
This is always a possibility.
You have been warned.
------------------------------------------------------------------------------------------------------------
Table of Contents
------------------------------------------------------------------------------------------------------------
GUIDE
- ClockWorkMod Recovery for the LG Optimus Elite
- Section 1.1 - What is ClockWorkMod Recovery?
- Section 1.2 - Le Grande List of Prerequisites
- Installing ClockWorkMod
- Section 2.1 - Accessing CWM.
- Section 2.2 - How Do I Update CWM?
- The ClockWorkMod Tour
- Section 3.1 - How Do I Explore the Menu?
- Section 3.2 - Navigating the Sea of ClockWorkMod.
- The Proper Way to Make a Backup, and Restore From a Backup, with Nandroid.
- Custom ROMs & Themes
- Section 5.1 - Where do I get a Custom ROM or Theme?
- Section 5.2 - Alright, I've downloaded a Custom ROM, now what?
- Section 5.3 - Installing/Flashing the Custom ROM.
- Question 1
- I'm stuck in fastboot, what do I do?
- Question 2
- What, exactly, is a Nandroid backup?
- Question 3
- My Nandroid backup is dated back to the 80's, how do I fix this?
- Question 4
- What is the Dalvik cache?
- Addendum
- Credits
Let's get started, shall we?
Welcome to the GUIDE!
------------------------------------------------------------------------------------------------------------
ClockWorkMod Recovery for the LG Optimus Elite
------------------------------------------------------------------------------------------------------------
Section 1.1
What is ClockWorkMod Recovery?
ClockWorkMod is a custom recovery for your phone - in our case, the LG Optimus Elite. It allows one to do many things with your device, the most notable being a Nandroid Backup, and allowing you to install a custom ROM (Read Only Memory, which in this context means a custom edition of the software that your phone runs). It also provides the basic recovery options such as a factory reset to return your phone to how it was fresh out of the box, also known as "Vanilla," or "Stock."
Section 1.2
Le Grande List of Prerequisites
Le Grande List of Prerequisites
Required
- You must have the ZV4 / ZV5 (Virgin Mobile) or ZV9 / ZVF (Sprint / Ting) firmware installed. Your OE will harass you about a system update being available until you inevitably submit to its whims.
- Enable Development by doing/going to the following on your phone:
- Settings
- Applications
- Development
- Check all on page.
- You must be rooted. See the All Things Root Guide for everything you need to know about rooting, from what it means, to the only three official methods for this phone of how to do so: either jcase's method, Hashtag's One-Click Root, or giantpune's app. You will not lose data by becoming rooted. After becoming rooted...
- You must have Superuser |OR| SuperSU installed.
- Once Superuser or SuperSU is installed, run the app and allow it to update the Superuser Binary.
- You must have BusyBox Free |OR| Pro installed.
- Once you have BusyBox installed, run the app and have it perform a Smart Install.
- You need the terminal emulator app installed. - Note: Not required if you're using giantpune's Noob Tool to install CWM.
- You need a root-permissions capable file explorer. Two prime examples of which are Root Explorer and Total Commander. - Note: Not required if you're using giantpune's Noob Tool to install CWM. Also, if you're using Total Commander, see this article.
- The current CWM build, which contains the capability for the time fix. Found on SendSpace | DropBox.
- MD5 is 3fbe49417b6d4153ffec2d3b963bacd8
- The time fix only works for CWM version 5.
- Acquire your Master Subsidy Lock (MSL) code. Here's how.
- Alternatively: While in CWM, flash (for the zip) giantpune's kernel. Then reboot. Use a root-permissions capable file explorer to browse to Sys/devices/virtual/lg_fw_diagclass/lg_fw_diagcmd/msl, and open it with a text editor. This will display your MSL.
- Enable Diag Mode via the following:
- Dial ##DIAG# in the same way you would dial any regular phone number.
- Input your MSL at the prompt.
- Tap on DIAG
- Tap on Enable.
- Alternatively: Download and install Ministro II and LG_OE_DiagMode-debug-unaligned, run Ministro II and let it download what it needs, then run LG_OE_DiagMode-debug-unaligned, tap on Push Me, then DIAG, then Enable.
- Download and install Quick Boot (Reboot) |OR| Titanium Backup |OR| ROM ToolBox.
- Basic cognitive function.
- Something to drink and/or eat.
- Time. A lot of time. And perhaps some thyme.
------------------------------------------------------------------------------------------------------------
Installing ClockWorkMod Recovery
------------------------------------------------------------------------------------------------------------
Installing ClockWorkMod Recovery
------------------------------------------------------------------------------------------------------------
Method #1: giantpune's Noob Installer
And, if for whatever reason you can't get giantpune's Noob Installer to work:Its been over a month and I haven't seen any huge bugs mentioned. So today I whipped up a noob-friendly installer for the CWM. I don't have any screenshots, or instructions because its just 1 button. Download LGOE_NoobTool-debug-unaligned.apk from Sendspace.com - send big files the easy way
Requirements -
Its built against the latest Necessitas, so you'll need Ministro II from about Nov 22 or newer. If you have installed an older one, you can delete it and get the latest one from the market. https://play.google.com/store/apps/details?id=org.kde.necessitas.ministro . If you don't have access to the market, there's link to it here http://files.kde.org/necessitas/installer/release/Ministro II v8.9.2.apk . The CWM installer will spit out an error and catch fire if you try to use an old version.
This installer uses the backlight exploit. If you have a kernel where that bug has been fixed, this installer won't work.
As usual, its only been tested on my phone. I offer no warranties, use it at your own risk.
Method #2: Advanced Install
Proceed at your own risk. Be careful. I don't believe CWM has been tested on an Elite running ZV4, but it seems to run well on ZV5. This guide was written specifically for the CWM BIN file named part_13_cwm_9_21_02_09.bin, but it will work for future releases from giantpune. Just alter the below commands to reflect the different file name.
Install with terminal emulator on your phone:
1. Download the CWM bin file and copy it to the root of your /sdcard (you can leave it in the Download directory if you want, but the following dd command will need to be slightly different if you do).
2. Run the terminal emulator app. (Download: https://play.google.com/store/apps/details?id=jackpal.androidterm)
3. Type su and tap the [Enter] key (Allow root access if you are prompted by Superuser/SuperSU)
4. Type busybox md5sum /sdcard/part_13_cwm_9_22_17_32.bin and tap the [Enter] key
Check to make sure the returned value matches the md5 which is posted along with each CWM bin file.
5. Type dd if=/sdcard/part_13_cwm_9_22_17_32.bin of=/dev/block/mmcblk0p14 and tap the [Enter] key
Once it's finished writing CWM to the recovery partition you'll see some output regarding the speed and size of the operation.
6. Type busybox md5sum /dev/block/mmcblk0p14 and tap the [Enter] key
Once again, check to make sure the returned value matches the md5 which is posted along with each CWM bin file. Close the terminal emulator app.
7. Run a root file explorer (such as Root Explorer) on your phone. Navigate to /system/etc/ and Mount R/W (read/write). Then rename the file named install-recovery.sh to install-recovery.sh.bak. If you don't see this file at this location on your phone, then you're finished.
*At this point, you may safely delete the CWM build / .bin file from your sdcard; it is no longer needed*
------------------------------------------------------------------------------------------------------------
Congratulations!
You have successfully installed CWM Recovery onto your Optimus Elite!
------------------------------------------------------------------------------------------------------------
Section 2.1
Accessing CWM
------------------------------------------------------------------------------------------------------------
Congratulations!
You have successfully installed CWM Recovery onto your Optimus Elite!
------------------------------------------------------------------------------------------------------------
Section 2.1
Accessing CWM
Method #1: The Extended Power Menu
If you're on a ROM for the Optimus Elite with this feature, you can reboot into recovery simply by holding down the power button until the power menu comes up, then tapping on "Recovery," and then "Ok."
Method #2: The app way
- Quick Boot (Reboot):
After downloading and installing Quick Boot, run the app. Tap Recovery, and your OE will reboot straight into ClockWorkMod Recovery.
- Titanium Backup:
Run Titanium Backup (either Regular or Pro). Press the capacitive/soft/bottom menu key on your phone. Tap "More." Scroll down to the bottom. Tap "Reboot the device," then "Reboot to recovery mode."
- ROM ToolBox:
Run ROM ToolBox (either Lite or Pro), scroll down to the bottom, tap on "Rebooter," then "Reboot Recovery."
Method #3: Via ADB
Through the terminal/terminal emulator, enter the following:
Code:
adb reboot recoveryMethod #4: Old School
If your Optimus Elite is currently powered on, power it off. Turn it back on by holding down the power button. Before, or while, it is powering on, hold down the Volume Down (-) button/bottom part of the volume rocker until the phone enters ClockWorkMod, depicted below:
Image courtesy of MacFett. Resized.
Section 2.2
How Do I Update CWM?
Follow the same steps you did when installing CWM, but this time with the updated .bin file provided above, along with the appropriate changes to step 4 and 5, to overwrite your now old installation of CWM with the new one, and you're good to go.
------------------------------------------------------------------------------------------------------------
The ClockWorkMod Tour
------------------------------------------------------------------------------------------------------------
The ClockWorkMod Tour
------------------------------------------------------------------------------------------------------------
This is where it gets fun, and where we'll get to the exciting part of CWM: Nandroid backups and custom ROMs. How to flash them with CWM, and flying away from stock on the wings of Angel - well, if CWM had wings. And if CWM was an Angel. You get the idea. Although it does have a snazzy top hat. But first things first....
Section 3.1
The touch screen doesn't work! / How do I explore the menu?
The touch screen doesn't work! / How do I explore the menu?
You can navigate the entries in the menu by using the following:
- +/- Volume Keys = Up / Down
- Home Key = Up
- Menu Key = Down
- Back Key = Back
- Magnifying Glass = Select / Enter
- Power Button = Select / Enter
Section 3.2
Navigating the Sea of ClockWorkMod
Navigating the Sea of ClockWorkMod
And here we begin our complete feature tour. Get ready; it's kind of lengthy.
Main Menu
- reboot system now
- Reboots the device normally.
- apply update from sdcard
- This is used for installation of any update, ROM, kernel, theme, etc. that is in a .zip format installable/flashable from recovery, as long as the file is named update.zip and it has been placed in the root directory of your SD card (i.e. not in any sub-folder)
- wipe data/factory reset
- Deletes all of your data, and returns the phone back to how it was when it first came out of the box.
- wipe cache partition
- Wipes all of the data in the cache, which is temporary storage, that has built up over time. Helps keep your device clean.
- install zip from sdcard
- choose zip from sdcard
- Lets you install any zip file, with any name, from any location on your external SD card. The file can be for a ROM, a kernel, an application, a theme or any mod as long as it is in recovery-flashable zip format. Entering this option will bring up a screen that will allow you to browse your SD card for the zip file and select it for installation.
- apply /sdcard/update.zip
- The same as the ‘apply update from sdcard’ option in the main menu.
- toggle signature verification
- Turns the signature verification on and off. When signature verification is on, you will not be able to install any custom ROMs that haven’t been signed by the developers (most custom ROMs aren’t signed). Switching it off skips the signature verification check and proceeds with the installation.
- toggle script asserts
- Turns script asserts on or off. Unless you need to use this option for some reason, this is best left untouched.
- choose zip from internal sdc
- Same as choosing a .zip file from your external SD card, except this is only for the phone's internal SD card - the storage space that came with the phone.
- +++++Go Back+++++
- choose zip from sdcard
- backup and restore
- backup
- Makes a Nandroid backup, which is a snapshot of your phone’s entire internal memory including all partitions, and saves it on the external SD card by default.
- restore
- Lets you restore a previous backup that is stored on your external SD card. Entering this option presents you with a list of existing backups, by date, on the SD card that you can choose from to restore.
- advanced restore
- Allows you to restore specific partitions from a Nandroid backup that is saved to your external SD card.
- backup to internal sdcard
- Makes a Nandroid backup, but saves it to your internal SD card instead of external.
- restore from internal sdcard
- Lets you restore a previous backup that is stored on your internal SD card.
- advanced restore from intern
- Allows you to restore specific partitions from a Nandroid backup that is saved to your internal SD card.
- +++++Go Back+++++
- backup
- mounts and storage
- mounting/unmounting /cache, /system, /data, /emmc (internal sdcard), /sdcard (external sdcard)
- Lets you mount or unmount these partitions. Unless you have to do so for some reason, these are best left untouched.
- formatting /cache, /system, /data, /emmc, /sdcard
- Formatting irreversibly deletes data. These options allows you to format the data stored on these partitions - use extreme caution here as you can easily brick your phone if you don't know what you're doing.
- (un)mount USB storage
- Lets you enable USB mass storage mode for your SD card right from recovery so that you can connect it to your computer via USB and transfer any files to/from it without having to leave recovery.
- +++++Go Back+++++
- mounting/unmounting /cache, /system, /data, /emmc (internal sdcard), /sdcard (external sdcard)
- advanced
- Reboot Recovery
- Lets you directly and very conveniently reboot from recovery right back into recovery. This is useful option for certain back-to-back installations that require the device to at least boot once between them.
- Wipe Dalvik Cache
- Allows you to wipe the cache for the Dalvik virtual machine (the custom-built Java virtual machine for Android).This is required before most ROM installations and at other occasions too, for fixing some problems.
- Wipe Battery Stats
- Wipes the saved battery usage statistics and effectively recalibrates the battery. Useful in various scenarios, for example if Android isn’t showing correct battery levels.
- Report Error
- In case of errors, this feature can be used to save a log of recent ClockworkMod recovery operations on the SD card that you can later report from Android using ROM Manager (or give it to giantpune).
- Key Test
- Lets you press any of the hardware keys to see if they are properly functioning, and to see their key codes.
- Show log
- (Presumably) displays the logcat log.
- Partition SD Card
- This option gives you a no-frills way to partition your SD card properly for use with ROMs that support data2ext (a very handy hack for low internal memory devices that enables an /sd-ext partition on the SD card to be used as the internal user data storage i.e. as the /data partition). Once this option is selected, you will be given options to choose the sizes for the /sd-ext partition as well as an optional /swap partition on the SD card, and will then automatically format it for you, leaving the remaining space for normal SD card usage. This option will wipe all data from your SD card so use it with caution.
- Fix Permissions
- Fixes the file permissions for the internal memory partitions back to default. This is very useful as a fix for several errors and Force-Closes that start appearing after you or an application you installed and provided root access end up messing up the permissions of important files.
- +++++Go Back+++++
- Reboot Recovery
- power off
- Powers off the device.
- +++++Go Back+++++
------------------------------------------------------------------------------------------------------------
The Proper Way to Make, and Restore From, a Nandroid Backup
------------------------------------------------------------------------------------------------------------
The Proper Way to Make, and Restore From, a Nandroid Backup
------------------------------------------------------------------------------------------------------------
Backup:
Reboot into recovery
Wipe cache partition
Advanced -> Wipe dalvik cache
Go Back
Backup and Restore
Backup
Wait
Go Back
Reboot
Restore:
Reboot into recovery
Clear cache
Advanced -> Wipe dalvik
Go back
Mounts and storage -> format system
Format data
Format cache
Go back
Backup and restore
Restore
Select your backup that you want to restore
Wait
Go back
Reboot
------------------------------------------------------------------------------------------------------------
Custom ROMs & Themes
------------------------------------------------------------------------------------------------------------
Custom ROMs & Themes
------------------------------------------------------------------------------------------------------------
A custom ROM is a customized, or personalized, version of the Android device's Operating System, built by Developers (occasionally known as Chefs). There are nigh-innumerable advantages to having a custom ROM, and some of the most frequently seen benefits include, but are not limited to; greater battery life/longevity, less bloatware (junk apps that manufacturers add to the phone that no one uses, and slows the phone down), greater speed, a custom theme or look, etc.
Section 5.1
Where do I get a Custom ROM or Theme?
Where do I get a Custom ROM or Theme?
There are multiple threads on this Optimus Elite board where you can acquire a custom (or stock) ROM. Here is the full list of all of the currently available ROMs for the Elite, in alphabetical order:
Build Your Own ROM:
Custom ROMs: