Install the app
How to install the app on iOS
Follow along with the video below to see how to install our site as a web app on your home screen.
Note: This feature may not be available in some browsers.
-
After 15+ years, we've made a big change: Android Forums is now Early Bird Club. Learn more here.
You are using an out of date browser. It may not display this or other websites correctly.
You should upgrade or use an alternative browser.
You should upgrade or use an alternative browser.
How to dramatically improve your camera (picture and video) quality
- Thread starter Wlliam.
- Start date
-
- Tags
- htc desire
LECTER
Android Expert
Actually, you take off the back cover and then pop it out, no need to worry about the lens.From the looks of it (and this makes sense, really), you pop it *out* from the inside ... and hope you don't scratch your lens.")
sare99
Member
Has anyone that punched out the plastic noticed any problems over time with the lens ? Mine is severly needing popped and I really want to do it ... but bottle crashing about doing it lol
Do you just take a cotton bud to pop it out ? is this from the inside of the cover outward or from the outside inward that you do it ????
Yep....just take the back cover off and press with a cotton bud from the inside outward. Mine pinged off in one piece with no problem at all just leaving a bit of glue residue on the black outer ring which I subsequently peeled off.
No problems with my lens to date either (but I only removed the plastic a couple of weeks ago in all fairness). I didn't put anything else in to cover the lens either but I think the lens may have its own covering anyway as I can definitely see something like a cover reflecting back from the 3rd recess down when.....1st = silver outer bezel, 2nd = black outer ring, 3rd = stippled grey surface, 4th = the lens itself.....and I can tap whatever it is with the end of a paperclip so I'm not gonna worry about it.
")
Euphobia
Newbie
Hi all,
Hope this is of use. I think I might have found something for replacing the plastic lens cover.
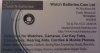
Below are links to a couple of places that sell Mineral glass for watches.
My Desire is only a couple of weeks old so no problems with the plastic cover for me yet but I'll be trying this out later.
Top right picture, Product code U152/02 -
garryknight
Well-Known Member
I've only had my Desire for just over 2 weeks but I noticed on day 1 that the camera produced photos with a blue tint to them. I've tried comparing back-on and back-off photos and the back-off ones are much clearer. I tried the toothpaste on the front of the lens cover and it made a slight improvement, though still not all that acceptable. I was resigned to the fact that the camera in my phone isn't that useful compared to my DSLR, even though I have got a few good pics out of the Desire.
Then I had a thought - I cleaned the inside of my lens cover and that made a real difference. It's not as good as removing the back cover but it's certainly an improvement.
Then I had a thought - I cleaned the inside of my lens cover and that made a real difference. It's not as good as removing the back cover but it's certainly an improvement.
turbohobbit
Android Enthusiast
Now, I'm as keen to get decent piccies out of my Desire as the next bloke, but can I just make one small point?
You're never going to get pictures out of a phone camera that are as good as a DSLR. That's tantamount to comparing a moped with a Merc S-Class. Yeah, both get you to the same place, but one gets you there quickly, warm, and in luxury, while the other gets you there slowly, cold, and with a sore arse.
You're never going to get pictures out of a phone camera that are as good as a DSLR. That's tantamount to comparing a moped with a Merc S-Class. Yeah, both get you to the same place, but one gets you there quickly, warm, and in luxury, while the other gets you there slowly, cold, and with a sore arse.
paulcooper
Android Enthusiast
I have popped the cover out off my case and by eck the quality is amazingly better. i left the black sticky on as it is good for collecting dust from my pocket.
garryknight
Well-Known Member
simmouk
Newbie
I've never really noticed that my photos weren't up to the grade before happening on this thread today! (in fact I'm sure I've read it before but it must have been before my lens got marked so it wasn't a problem!) - I took a photo with the cover of, and then again with the cover back on, and the result was stupidly amazing! I've just tried "the toothpaste method" (so my phone smells as minty fresh as I do) and that seems to have help no end as well! Obviously I echo all the other comments about the stupid lens design and placement in the first place, but it's awesome to know that someone found this quirky little tip and posted it here for us all!

SiHa
Android Enthusiast


Well, it arrived today in a gert big cardboard box.
I removed the old window & adhesive tape and cleaned round with a cotton bud and IPA.
I applied a small amout or Araldite Instant epoxy to the edges of the opening and pressed the new window in.
After a minute or so (initial cure, but before it's hard) I gave the top a good wipe over with IPA to remove any surplus from the window and surround.
Finally, a cotton bud+IPA on the inside after the epoxy had fully cured to remove any fingerprints.
You can see the glue doesn't go all the way round, but I'm confident I did get it around the whole circumference, so there should at least be a gasket to stop any dust getting in.
As can be seen from these pictures, the original window was pretty screwed, and had a huge crack through the middle. The before and after shots of the watch show the difference it made!
I took a couple of shots with the back off, and I can't honestly see any difference between those and with the new window fitted.
Verdict: The new one is, if anything, slightly thinner than the old, and feels slightly less than flush which should help to protect it. Pictures are crystal clear. I've yet to try it in strong light to see if it creates any glare, but don't think there will be any problems there. Very happy.
This is quite expensive at
turbohobbit
Android Enthusiast
IPA? Presume we're not talking Greene King brew here...
SiHa
Android Enthusiast
IPA? Presume we're not talking Greene King brew here...
Not unless you're buying!
IPA = Isopropyl Alcohol / Isopropanol
The stuff you used to get with tape-head cleaning cassettes. Any alcohol will do really, or Lighter Fluid. Nail varnish remover (acetone) should do as well, but I've not used this on epoxy.
I just ordered the "U152/02 Mineral Glasses Hardened Thin Graduated by 0.1mm Thickness 0.7-0.8mm Available Size 10.0mm to 40.0mm" from Watch Batteries.Com Ltd; total order price including shipping to Denmark was
KlaymenDK
Android Expert
Yeah, somebody asked me for updates.Any updates on this?
 No mate, it's still in the mail, but I promise I will keep you guys posted!
I just ordered the "U152/02 Mineral Glasses Hardened Thin Graduated by 0.1mm Thickness 0.7-0.8mm Available Size 10.0mm to 40.0mm" from Watch Batteries.Com Ltd; total order price including shipping to Denmark was
Yeah, somebody asked me for updates.
Ah, when I looked at the date you posted I thought it was 11th September, as wrote the English way (11/09/10), so I thought it had been a while since you posted.
On reflection, it had only been 2 days!!
Keep us updated please, this is the method I am most interested in.
marcowil, would it be possible to fit the glass from the inside of the hole, or would it foul the casing/lens?
Thanks.
KlaymenDK
Android Expert
[Update 20110214: According to this post below, there is a glass available that does not require manual trimming; however, shipping outside of UK is rather expensive, with a total of about €41.]
[Update 20110212: I dropped my phone, and the glass cracked and fell off the cover. Perhaps this is an indication that double-sided tape is better than super glue, as it adds a slight layer of shock absorbtion.]
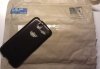
Allright, as I got home today my new camera glass was waiting for me. Gimme gimme gimme!
It was quite well packaged, in a padded envelope containing an invoice, a business card, and a small folded piece of cardboard containing an even smaller (cute, almost) envelope -- containing the glass.

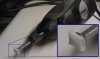
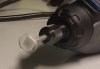
I poked out my old glass the other day, breaking it in the process, but held on to it for the purpose of this post.
The new glass is a little bit bigger than the original, but I already knew this when I ordered it (they don't make 'em any smaller than 10mm, and I think I needed about 9.5mm).

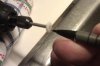
I needed to sand half a millimetre off of the diameter of the glass. Here's what I did. Please read the entire post before you get to work, and of course do this on your own risk!
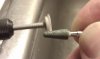
Break out the Dremel! Safety first, DO NOT DO THIS WITHOUT SAFETY GLASSES -- and possibly good ventilation, as I observed some incredibly fine and probably unhealthy glass dust rise off the glass as I worked on it. Got that? Good, moving on then.
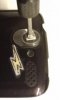
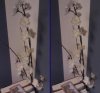
Make a mount for your glass. I found a nail that would fit the dremel mount, and stuck a tiny snippet of double-sided tape to the head of the nail.

Mark off the center of the mount. Do this by powering on the tool at a low speed and gently touching it with a soft pencil, and the center will become obvious. In these pictures I only placed a single dot, but it's more helpful to draw a circle that's as large as your tape allows.

Center the glass on the mount. Do this with the tool powered off and measure by eye. It's not going to be exactly right, but you should be able to get to within less than a quarter millimetre. (I learned that the macro focus on the Desire is not very good, sorry about that.)

It's time to actually do something (or break your glass, as the case may be). Don't sand too much at a time, and check your progress often. Instead of doing as pictured, keep your tool where it is and bring the cover to the class.

I chose the highest speed setting on the tool, a random sanding tip (I don't have a clue what the correct one would be, so I just chose one that looked reasonable), and use a very light touch. Let me repeat this: Use a very light touch when sanding! Too much pressure and your glass will come flying off, and you'll have to find it and re-center it. Also, be sure to touch the tip to the glass in such a position that any glass splinters will fly away from you, just in case. Did I mention the safety glasses?

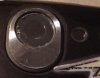
When you've got the size right, you might want to gently round off the corners of the edge, too, but it's not strictly necessary.
I actually ended up taking off about a millimetre, so the glass is slightly smaller than necessary, but it's all right. Glue it to the battery cover with something appropriate. For the test photos, I used a quarter-smidgen of paper glue, but then fixed it permanently with super glue applied ever-so-carefully to the outer rim of the surface of the glass (not the actual edge).

Attached are some comparative photos taken without cover, and with the new glass mounted in the cover. I'm sorry but they're quite small (I don't know how to work the size limitation in the attachments), but all the same you should be able to tell that you can't easily tell which is the "before" and which is the "after" photo. All the same, it's half past one in the morning now, and I can't wait to take a few shots in daylight in a few hours.


I think the improvement is quite excellent, and certainly worth the money.
That is all.
[Update 20110212: I dropped my phone, and the glass cracked and fell off the cover. Perhaps this is an indication that double-sided tape is better than super glue, as it adds a slight layer of shock absorbtion.]
Allright, as I got home today my new camera glass was waiting for me. Gimme gimme gimme!
It was quite well packaged, in a padded envelope containing an invoice, a business card, and a small folded piece of cardboard containing an even smaller (cute, almost) envelope -- containing the glass.
I poked out my old glass the other day, breaking it in the process, but held on to it for the purpose of this post.
The new glass is a little bit bigger than the original, but I already knew this when I ordered it (they don't make 'em any smaller than 10mm, and I think I needed about 9.5mm).
I needed to sand half a millimetre off of the diameter of the glass. Here's what I did. Please read the entire post before you get to work, and of course do this on your own risk!
Break out the Dremel! Safety first,
DO NOT DO THIS WITHOUT SAFETY GLASSES -- and possibly good ventilation, as I observed some incredibly fine and probably unhealthy glass dust rise off the glass as I worked on it. Got that? Good, moving on then.Make a mount for your glass. I found a nail that would fit the dremel mount, and stuck a tiny snippet of double-sided tape to the head of the nail.
Mark off the center of the mount. Do this by powering on the tool at a low speed and gently touching it with a soft pencil, and the center will become obvious. In these pictures I only placed a single dot, but it's more helpful to draw a circle that's as large as your tape allows.
Center the glass on the mount. Do this with the tool powered off and measure by eye. It's not going to be exactly right, but you should be able to get to within less than a quarter millimetre. (I learned that the macro focus on the Desire is not very good, sorry about that.)
It's time to actually do something (or break your glass, as the case may be). Don't sand too much at a time, and check your progress often. Instead of doing as pictured, keep your tool where it is and bring the cover to the class.
I chose the highest speed setting on the tool, a random sanding tip (I don't have a clue what the correct one would be, so I just chose one that looked reasonable), and use a very light touch. Let me repeat this: Use a very light touch when sanding! Too much pressure and your glass will come flying off, and you'll have to find it and re-center it. Also, be sure to touch the tip to the glass in such a position that any glass splinters will fly away from you, just in case. Did I mention the safety glasses?
When you've got the size right, you might want to gently round off the corners of the edge, too, but it's not strictly necessary.
I actually ended up taking off about a millimetre, so the glass is slightly smaller than necessary, but it's all right. Glue it to the battery cover with something appropriate. For the test photos, I used a quarter-smidgen of paper glue, but then fixed it permanently with super glue applied ever-so-carefully to the outer rim of the surface of the glass (not the actual edge).
Attached are some comparative photos taken without cover, and with the new glass mounted in the cover. I'm sorry but they're quite small (I don't know how to work the size limitation in the attachments), but all the same you should be able to tell that you can't easily tell which is the "before" and which is the "after" photo. All the same, it's half past one in the morning now, and I can't wait to take a few shots in daylight in a few hours.
I think the improvement is quite excellent, and certainly worth the money.
That is all.
Attachments
-
 1-envelope.jpg12.7 KB · Views: 679
 -
 2-old-new.jpg22.7 KB · Views: 674
 -
 3-dremel.jpg14.7 KB · Views: 665
 -
 4-marking.jpg14.6 KB · Views: 676
 -
 5-centering.jpg10.2 KB · Views: 678
 -
 6-sanding.jpg11.9 KB · Views: 676
 -
 7-check.jpg6 KB · Views: 685
 -
 8-result.jpg10.5 KB · Views: 691
 -
 9-comparison1.jpg22.2 KB · Views: 686
 -
 9-comparison2.jpg11.7 KB · Views: 695
http://androidforums.com/members/klaymendk.htmlThanks for taking the plunge on this KlaymenDK and for taking the time to post the very clear walkthrough. Looks like to works pretty well!
Harry2
Extreme Android User
The small costs of the mineral glass are tempting
I think I try it, too.
For problem with the bigger diameter of the glass I think I found an easy solution.
I am considering if I should enlarge the 9.5mm diameter pocket hole of the lens cover.
I would use my router (for woodwork, not for network ) with a 10mm cylinder milling cutter.
The depth of the bigger pocket hole should be with the thickness of the glass equal.
This is no problem with a router.
Harry
I think I try it, too.
For problem with the bigger diameter of the glass I think I found an easy solution.
I am considering if I should enlarge the 9.5mm diameter pocket hole of the lens cover.
I would use my router (for woodwork, not for network
) with a 10mm cylinder milling cutter.The depth of the bigger pocket hole should be with the thickness of the glass equal.
This is no problem with a router.
Harry
KlaymenDK
Android Expert
Harry, that's a good approach, especially with the added benefit of the ingreased depth. I'm not so sure that there's actually enough material to make the lens flush (or even recessed?).
I was wanting to do the same thing, but I don't have a router and this way there was less risk of making a mess of it.
I was wanting to do the same thing, but I don't have a router and this way there was less risk of making a mess of it.