
THIS GUIDE IS POSTED WITH MANY THANKS TO SENIOR MEMBER IRONASS
This guide was originally produced for the Samsung Galaxy S4 (GT-i9505) by Ironass, this is an edited version with links and guidance re-written for the Galaxy Note 3 (SM-N9005) by him and checked by myself (dynomot). Please ask any questions raised by the guide here in this thread, not directly to Ironass. He has kindly produced this guide only and does not own a Note 3.
#1.0. This is a step-by-step guide, with videos and screenshots, for absolute beginners to Android and the Samsung Note 3, SM-N9005 (Snapdragon). Please read it carefully and thoroughly as it will take you through the installation procedure and answer most of your queries.
(Warning On firmware releases that are Knox security enabled the following instructions will result in the Knox security flag being tripped. See, Knox Security & locked bootloader on new firmwares for more information.)
Phil3759 is well known for his CWM, (ClockWorkMod), custom recoveries in the rooting and modding circles.
The custom recovery is essentially the phone's stock kernel image with an elaborate CWM, ClockWorkMod, Recovery incorporated that replaces the very basic one that comes with stock and allows you to create, "nandroid", backups and a whole host of other tasks that are essential to modding your phone.

You cannot root your phone with these recoveries so you will need to be rooted to install them.
There are 2 methods of installing the PhilZ recovery that depend on whether you have a stock or a custom, CWM, Recovery already installed on your rooted phone.
Method #1 for rooted phones with STOCK Recovery
#1.1.Download PhilZ recovery for your model of phone
Use this method of installation if you do not already have a custom, CWM, recovery installed. You will no doubt have Odin3, the necessary drivers and a USB lead already as you are rooted.
It requires that you flash, via Odin3, the PhilZ recovery which, by itself, cannot be used to root your phone.
Download the latest PhilZ recovery .tar.md5 file for your model of phone.
Samsung Note 3, SM-N9005 (Snapdragon)... Download the latest PhilZ_touch hlte.tar.md5 download and copy/cut & paste it to your desktop, do not extract it or unzip it, this is the actual file you need.
here.
If you are unsure of the model of your phone, go to... Settings > More > About device > Model number
#1.2. Step 1.
Ensure that your phone is fully charged and that you have USB debugging enabled.
On your phone, go to... Settings > More > About device > Build number and tap 7 times on it. This will enable the hidden, “Developer options”, menu when you go back to the, “More”, menu. Open the, “Developer options”, menu and check, “USB debugging”.
Put your phone into Download mode by turning it off completely and then press and hold the following buttons... Volume Down + Home (centre hard key) + (lastly) Power. Continue to hold these buttons until your phone boots into the Warning! screen asking you to press volume up if you want to continue or volume down to cancel. Press Volume Up.
#1.3. Step 2.
Right click on Odin and select, "Run as Administrator", to open it. Ensure that the Samsung Kies programme is NOT running at the same time as this can cause problems
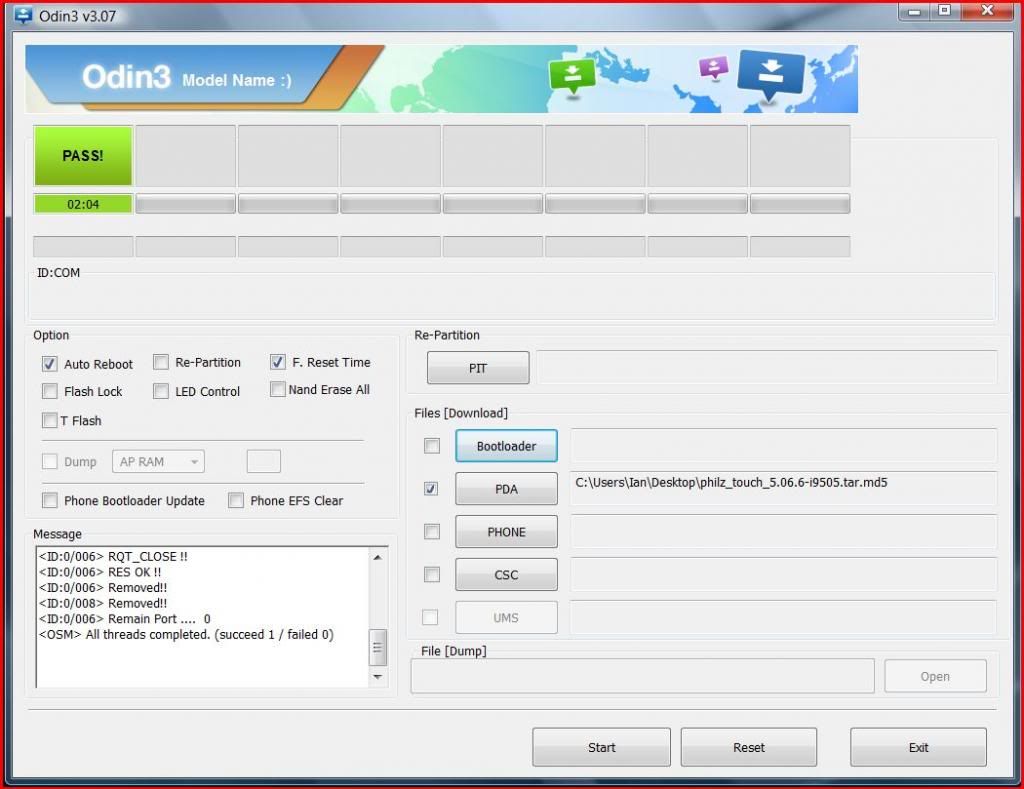
With Odin displayed on your PC screen, click on the AP button, (formerly known as PDA on earlier versions of Odin), and navigate to the PhilZ .tar file, that you placed on your home screen, and select it.
Make sure that Re-Partition is unchecked and that Auto Reboot, F.Reset Time and PDA are checked and that the PDA box now contains your .tar file.
#1.4. Step 3.
Connect your phone, still in Download mode, to the PC using the USB lead. If you have successfully connected to Odin you should see the ID:COM box in Odin turn yellow or light blue, (depending on which version of Odin you are using).
#1.5. Step 4.
In Odin click the Start button and you should see a green progress bar above ID:COM and shortly after that the box above it will turn green with the word PASS! in it and your phone will automatically reboot. If during re-booting you are offered the option to, "Fix Root", then select No.
Now go to #1.7 to install Nandroid Manager and Online Nandroid Backup.
#1.6. Method #2 for rooted phones with CWM/TWRP Recovery
This method is for those who are already rooted and have a CWM or TWRP Recovery but wish to install the PhilZ custom recovery with its enhanced touch facilities.
Before doing anything, you should do a nandroid, Titanium and /efs file backup to your external SD card.
These are your, "Get out of jail FREE" cards in case anything goes wrong, now or in the future.
Download the latest PhilZ custom recovery .zip file for your model of phone.
Samsung Note 3, SM-N9005 (Snapdragon)... Download the latest PhilZ_touch hlte..zip file, here.
(If you are unsure of the model of your phone, go to... Settings > More > About device > Model number)
Place it on your external SD card, safest place, (if you downloaded it using your phone it will be in... "/mnt/sdcard/Download").
You should now boot your phone into Recovery mode, see video, here, and select Install zip and choose External sdcard. You then navigate to "philz_touch .zip", and install it. Before rebooting it is a good idea to also select Wipe cache partition and, under Advanced, Wipe dalvik cache. Now, go back and select Reboot System now.
For more details and support for the PhilZ custom recovery, visit the developers website, here.
#1.7. Installing Nandroid Manager and Online Nandroid Backup.
To make full use of the options that are now available you will need to download and install, "Nandroid Manager", and, "Online Nandroid Backup", from the Google Play Store.
You are now able to make, "nandroid", (mirror image of OS, app's and settings), backups and restores.
Tip: In Online Nandroid Backup > Menu > Settings > Default Backup Settings > Save Location... set it to, "/storage/extSdCard", as nandroids can be around 4GB and would soon fill up your internal storage.
#1.8. Note: If you flash a stock Samsung firmware which contains a stock, un-rooted, kernel, in future you will need to re-root and install the custom recovery again.
Thanks go to Phil3759 for his kernel and instructions. Feel free to make a donation to Phil3759 for all his hard work.
(Whilst I have taken every care in compiling this guide, I cannot be held responsible for any damage that may occur through its use, or mis-use, and the decision to use this guide lies with you, the owner.
This guide is written solely for, and on behalf of, Android Forums and may not be reproduced, in part or whole, without permission.)
ironass motto... "Flash in haste... repent at leisure"")
This guide was originally produced for the Samsung Galaxy S4 (GT-i9505) by Ironass, this is an edited version with links and guidance re-written for the Galaxy Note 3 (SM-N9005) by him and checked by myself (dynomot). Please ask any questions raised by the guide here in this thread, not directly to Ironass. He has kindly produced this guide only and does not own a Note 3.
#1.0. This is a step-by-step guide, with videos and screenshots, for absolute beginners to Android and the Samsung Note 3, SM-N9005 (Snapdragon). Please read it carefully and thoroughly as it will take you through the installation procedure and answer most of your queries.
(Warning On firmware releases that are Knox security enabled the following instructions will result in the Knox security flag being tripped. See, Knox Security & locked bootloader on new firmwares for more information.)
Phil3759 is well known for his CWM, (ClockWorkMod), custom recoveries in the rooting and modding circles.
The custom recovery is essentially the phone's stock kernel image with an elaborate CWM, ClockWorkMod, Recovery incorporated that replaces the very basic one that comes with stock and allows you to create, "nandroid", backups and a whole host of other tasks that are essential to modding your phone.

You cannot root your phone with these recoveries so you will need to be rooted to install them.
There are 2 methods of installing the PhilZ recovery that depend on whether you have a stock or a custom, CWM, Recovery already installed on your rooted phone.
Method #1 for rooted phones with STOCK Recovery
#1.1.Download PhilZ recovery for your model of phone
Use this method of installation if you do not already have a custom, CWM, recovery installed. You will no doubt have Odin3, the necessary drivers and a USB lead already as you are rooted.
It requires that you flash, via Odin3, the PhilZ recovery which, by itself, cannot be used to root your phone.
Download the latest PhilZ recovery .tar.md5 file for your model of phone.
Samsung Note 3, SM-N9005 (Snapdragon)... Download the latest PhilZ_touch hlte.tar.md5 download and copy/cut & paste it to your desktop, do not extract it or unzip it, this is the actual file you need.
here.
If you are unsure of the model of your phone, go to... Settings > More > About device > Model number
#1.2. Step 1.
Ensure that your phone is fully charged and that you have USB debugging enabled.
On your phone, go to... Settings > More > About device > Build number and tap 7 times on it. This will enable the hidden, “Developer options”, menu when you go back to the, “More”, menu. Open the, “Developer options”, menu and check, “USB debugging”.
Put your phone into Download mode by turning it off completely and then press and hold the following buttons... Volume Down + Home (centre hard key) + (lastly) Power. Continue to hold these buttons until your phone boots into the Warning! screen asking you to press volume up if you want to continue or volume down to cancel. Press Volume Up.
#1.3. Step 2.
Right click on Odin and select, "Run as Administrator", to open it. Ensure that the Samsung Kies programme is NOT running at the same time as this can cause problems
With Odin displayed on your PC screen, click on the AP button, (formerly known as PDA on earlier versions of Odin), and navigate to the PhilZ .tar file, that you placed on your home screen, and select it.
Make sure that Re-Partition is unchecked and that Auto Reboot, F.Reset Time and PDA are checked and that the PDA box now contains your .tar file.
#1.4. Step 3.
Connect your phone, still in Download mode, to the PC using the USB lead. If you have successfully connected to Odin you should see the ID:COM box in Odin turn yellow or light blue, (depending on which version of Odin you are using).
#1.5. Step 4.
In Odin click the Start button and you should see a green progress bar above ID:COM and shortly after that the box above it will turn green with the word PASS! in it and your phone will automatically reboot. If during re-booting you are offered the option to, "Fix Root", then select No.

Now go to #1.7 to install Nandroid Manager and Online Nandroid Backup.
#1.6. Method #2 for rooted phones with CWM/TWRP Recovery
This method is for those who are already rooted and have a CWM or TWRP Recovery but wish to install the PhilZ custom recovery with its enhanced touch facilities.
Before doing anything, you should do a nandroid, Titanium and /efs file backup to your external SD card.
These are your, "Get out of jail FREE" cards in case anything goes wrong, now or in the future.
Download the latest PhilZ custom recovery .zip file for your model of phone.
Samsung Note 3, SM-N9005 (Snapdragon)... Download the latest PhilZ_touch hlte..zip file, here.
(If you are unsure of the model of your phone, go to... Settings > More > About device > Model number)
Place it on your external SD card, safest place, (if you downloaded it using your phone it will be in... "/mnt/sdcard/Download").
You should now boot your phone into Recovery mode, see video, here, and select Install zip and choose External sdcard. You then navigate to "philz_touch .zip", and install it. Before rebooting it is a good idea to also select Wipe cache partition and, under Advanced, Wipe dalvik cache. Now, go back and select Reboot System now.
For more details and support for the PhilZ custom recovery, visit the developers website, here.
#1.7. Installing Nandroid Manager and Online Nandroid Backup.
To make full use of the options that are now available you will need to download and install, "Nandroid Manager", and, "Online Nandroid Backup", from the Google Play Store.
You are now able to make, "nandroid", (mirror image of OS, app's and settings), backups and restores.
Tip: In Online Nandroid Backup > Menu > Settings > Default Backup Settings > Save Location... set it to, "/storage/extSdCard", as nandroids can be around 4GB and would soon fill up your internal storage.
#1.8. Note: If you flash a stock Samsung firmware which contains a stock, un-rooted, kernel, in future you will need to re-root and install the custom recovery again.
Thanks go to Phil3759 for his kernel and instructions. Feel free to make a donation to Phil3759 for all his hard work.
(Whilst I have taken every care in compiling this guide, I cannot be held responsible for any damage that may occur through its use, or mis-use, and the decision to use this guide lies with you, the owner.
This guide is written solely for, and on behalf of, Android Forums and may not be reproduced, in part or whole, without permission.)
ironass motto... "Flash in haste... repent at leisure"


