F
faber78
Guest
12/28/10 - repost if you've already seen this thread.
started its own thread with more appropriate title.
so far covers .9's, status bar notification color changes, carrier name change.
i did a simple copy and paste from a mess of two other threads, so please report any issues if anyone uses this tutorial.
system color changes in text now added....scroll down. 1/24/11
how to change the words you see on installation of a theme (updater script)....2/20/11 scroll down.
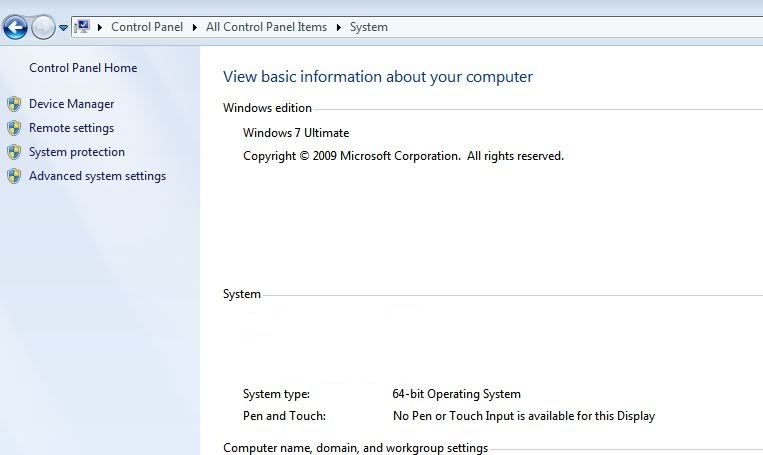
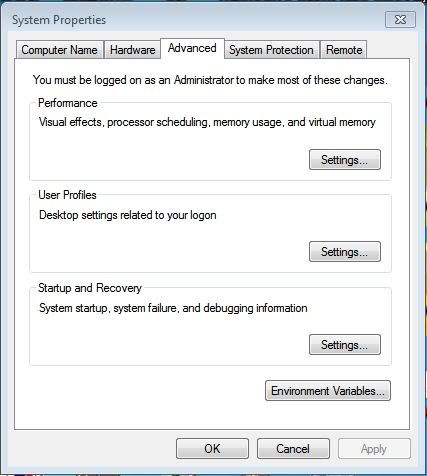
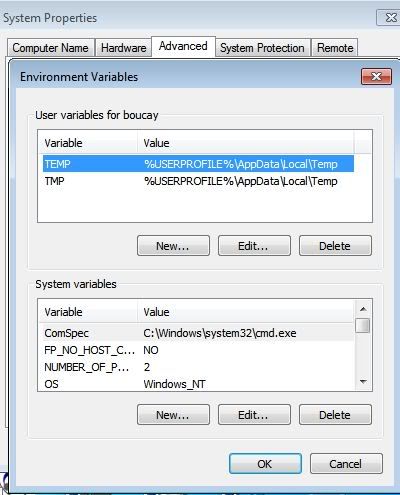
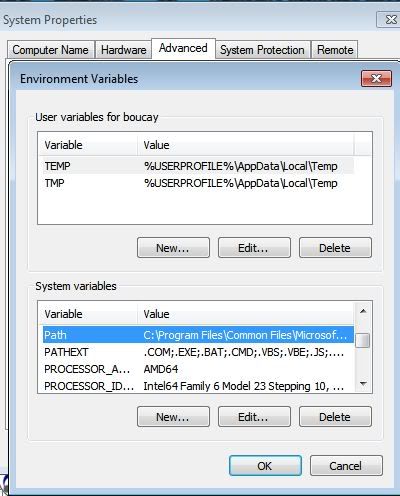
added Bouchigo's "getting java in your path" tutorial (thanks bo") )....2/27/11 scroll down.
)....2/27/11 scroll down.
--------------------------------------------
.9's (making things stretch):
I started this earlier and ran in to trouble. Apparently the android sdk r8 doesnt work the way r7 did and as easily as beta 9....at least with my little skill level. But I think we'll give it another go.
-I'm pretty much self-taught, so go easy on me.
Things you need:
-Time and patience
https://cds.sun.com/is-bin/INTERSHO...ProductRef=jdk-6u23-oth-JPR@CDS-CDS_Developer
(^Not sure if you need the developers java or regular, I have both now") ....over my head).
....over my head).
7-Zip
GIMP - The GNU Image Manipulation Program
Android SDK - Free software downloads and software reviews - CNET Download.com
(^f%#&, get this version....cause if you ever use 1 thing in a huge system of stuff....they'll go and change the thing you use....lol....)
[Release] xUltimate - Droid Forum - Verizon Droid & the Motorola Droid Forum
(xultimate draw9patch compiler; its toward the bottom of first post under standalone. I believe 86 is for 32 bit and 64 is for 64 bit).
-Extract xcompiler and android sdk to your desktop, install 7zip and gimp.
------------------------
So I'm gonna work in blkwhtandchrome and change the color of the menu background while still keeping the chrome trim looking good. We'll change it to .... let's say red. (Cause now that I have my phone how I like it I might as well mess with it)
First take your theme and make a copy somewhere safe. I like to use another partition on my ssd/hard drive so I can just drag and drop it to my desktop and it will easily make a copy keeping the original safe. You could probably easily do the same with a thumb drive or sd card or something.
Put your theme to work with on your desktop and call it "test" or whatever.


Lets do a little learning. Follow the pic below. (Close folder, by the way, is the little folder with the green arrow on the left of the location window, just under the copy to the right arrow).
(When you open 7zip, remember you can open more then one instance of 7zip which can mess with you later, and you need to do that at other times....its not a big deal, you wont do it on accident, I just want to mention it....you'll know you can see that there is another window open in bottom bar or on desktop like any other window. I just didnt want anyone to open two instances and then get messed up later when trying to close and finish one if they accidentally switched to the other, or anything else that might happen. To do other things we have to open 2 or more sometimes....not with this).
- Create a folder on your desktop called "pngs" and inside of 7zip locate your theme "test".
- Now click on it in 7zip (double click on my touch pad net book) and it will open up inside 7zip. Its like peeking inside a zipped folder without opening it.
- Now click on through these folders:
test (theme on desktop), system, framework, framework-res.apk, res, drawable-hdpi.
-Go to "edit" in top bar of 7zip, pick "select all" and it should look like the pic below.

-Then double click or whatever method your computer uses to drag and drop all of it in to your "pngs" folder. (Just grab one spot inside 7zip, it will all go with since you told it select all).
See below.

-Give it time to finish copying. You didnt move anything from the theme, you copied it all to your "png" folder. It wont effect the theme any until you put something back in to 7zip with the same name as something else, then it will overwrite that file....we'll get to that later.
-Open your "png" folder and look around. This is the inside graphics of your phone. (Some of them).
- Im looking for "menu_background_fill_parent_width.9".
Now lets stop. "How do you know what you are looking for?", you ask.
F$%^#$^ trial and error is how I found out....lol....hopefully you can find out an easier way. Plus it resembles what I'm looking for and the name kinda makes sense. But trial and error would be my answer.
Find the .png you want to edit and drag it to desktop. (Make a copy of it somewhere else, just like with the whole theme; if you think you may screw this up........I know I will....lol.)
Now open up Gimp, give it time to load up, and then drag and drop our .png on there.

Now follow pics below:


When you are done making changes, click "file" and select "save" or close it and it SHOULD ask you to save. DO NOT CHANGE THE NAME OF THE .PNG.
Now at this point it looks like you want and we kept transparency, so we should be able to just throw it back in the theme and go on, right?....I wish. You can try it just to see how bad it looks.
- Now go in to android sdk and find "tools" then find "draw9patch" and open it.....it should open up and you can drag/drop your .png on to it.
That should bring you to the pick below.
Follow directions on pic below and save then quit.
NEVER MIND THE NEXT PIC ISNT THE SAME PNG; PHOTOBUCKET MESSED UP MY TUTORIAL AND I JUST THREW IN THIS PIC. WORKS THE SAME.

BE SURE WHEN YOU USE .9THIS^ YOU DONT TELL IT IT CAN WRITE TEXT ON CURVES AND SUCH (i may have gone to far with my right side/bottom lines) OR THAT IT CAN STRETCH IN A CURVE UNLESS YOU WANT IT TO. ALL WE CARE ABOUT IN HERE IS THE BLACK DOT AT TOP/LEFT AND LINES RIGHT/BOTTOM.
Still not done.
Now open up your extracted file of xcompiler and go in to the folders (just open, not in 7zip):
- example1, res, drawable hdpi and delete everything in there. (its someone else's work....just delete all of it. Make sure you are hitting delete, not backspace.
Drag/drop (or copy paste or whatever) your png there.
- Back out until you see the little droid icon (and both example folders/etc.).
-Click/start the little droid icon.
-When it is done there should be a new folder that is called "done" (imagine that). Go into it and example1 and on until you find your png. Then drag/drop it on your desktop.
-Now open 7zip (or find the one you had open or whatever) and navigate to where we originally got all the pngs....look back at the beginning.
-Then right click/delete your new png....JUST KIDDING.....LOL....
(^If you accidentally deleted it; it's O.K., you needed the practice anyway).
-OK, seriously: drag/drop your new png right into 7zip where we got it from (EXACTLY IN THE SAME FOLDER YOU ORIGINALLY PULLED IT FROM), it will overwrite the old one. AS LONG AS YOU NEVER CHANGED THE NAME OF IT WHILE WORKING ON IT. Tell it yes you want to copy it there or whatever when it asks.
DELETED PIC; FOLLOW WRITTEN DIRECTIONS.
-Close 7zip and tell it "OK".
-Now load like normal and cross your fingers.
Look at that, its red and the chrome looks OK!

DELETED PIC.
Hope this helps someone.
-------------------------------------
started its own thread with more appropriate title.
so far covers .9's, status bar notification color changes, carrier name change.
i did a simple copy and paste from a mess of two other threads, so please report any issues if anyone uses this tutorial.
system color changes in text now added....scroll down. 1/24/11
how to change the words you see on installation of a theme (updater script)....2/20/11 scroll down.
added Bouchigo's "getting java in your path" tutorial (thanks bo
)....2/27/11 scroll down.--------------------------------------------
.9's (making things stretch):
I started this earlier and ran in to trouble. Apparently the android sdk r8 doesnt work the way r7 did and as easily as beta 9....at least with my little skill level. But I think we'll give it another go.
-I'm pretty much self-taught, so go easy on me.
Things you need:
-Time and patience
https://cds.sun.com/is-bin/INTERSHO...ProductRef=jdk-6u23-oth-JPR@CDS-CDS_Developer
(^Not sure if you need the developers java or regular, I have both now
....over my head).7-Zip
GIMP - The GNU Image Manipulation Program
Android SDK - Free software downloads and software reviews - CNET Download.com
(^f%#&, get this version....cause if you ever use 1 thing in a huge system of stuff....they'll go and change the thing you use....lol....)
[Release] xUltimate - Droid Forum - Verizon Droid & the Motorola Droid Forum
(xultimate draw9patch compiler; its toward the bottom of first post under standalone. I believe 86 is for 32 bit and 64 is for 64 bit).
-Extract xcompiler and android sdk to your desktop, install 7zip and gimp.
------------------------
So I'm gonna work in blkwhtandchrome and change the color of the menu background while still keeping the chrome trim looking good. We'll change it to .... let's say red. (Cause now that I have my phone how I like it I might as well mess with it
)First take your theme and make a copy somewhere safe. I like to use another partition on my ssd/hard drive so I can just drag and drop it to my desktop and it will easily make a copy keeping the original safe. You could probably easily do the same with a thumb drive or sd card or something.
Put your theme to work with on your desktop and call it "test" or whatever.
Lets do a little learning. Follow the pic below. (Close folder, by the way, is the little folder with the green arrow on the left of the location window, just under the copy to the right arrow).
(When you open 7zip, remember you can open more then one instance of 7zip which can mess with you later, and you need to do that at other times....its not a big deal, you wont do it on accident, I just want to mention it....you'll know you can see that there is another window open in bottom bar or on desktop like any other window. I just didnt want anyone to open two instances and then get messed up later when trying to close and finish one if they accidentally switched to the other, or anything else that might happen. To do other things we have to open 2 or more sometimes....not with this).
- Create a folder on your desktop called "pngs" and inside of 7zip locate your theme "test".
- Now click on it in 7zip (double click on my touch pad net book) and it will open up inside 7zip. Its like peeking inside a zipped folder without opening it.
- Now click on through these folders:
test (theme on desktop), system, framework, framework-res.apk, res, drawable-hdpi.
-Go to "edit" in top bar of 7zip, pick "select all" and it should look like the pic below.
-Then double click or whatever method your computer uses to drag and drop all of it in to your "pngs" folder. (Just grab one spot inside 7zip, it will all go with since you told it select all).
See below.
-Give it time to finish copying. You didnt move anything from the theme, you copied it all to your "png" folder. It wont effect the theme any until you put something back in to 7zip with the same name as something else, then it will overwrite that file....we'll get to that later.
-Open your "png" folder and look around. This is the inside graphics of your phone. (Some of them).
- Im looking for "menu_background_fill_parent_width.9".
Now lets stop. "How do you know what you are looking for?", you ask.
F$%^#$^ trial and error is how I found out....lol....hopefully you can find out an easier way. Plus it resembles what I'm looking for and the name kinda makes sense. But trial and error would be my answer.
Find the .png you want to edit and drag it to desktop. (Make a copy of it somewhere else, just like with the whole theme; if you think you may screw this up....
....I know I will....lol.) Now open up Gimp, give it time to load up, and then drag and drop our .png on there.
Now follow pics below:
When you are done making changes, click "file" and select "save" or close it and it SHOULD ask you to save. DO NOT CHANGE THE NAME OF THE .PNG.
Now at this point it looks like you want and we kept transparency, so we should be able to just throw it back in the theme and go on, right?....I wish.
You can try it just to see how bad it looks.- Now go in to android sdk and find "tools" then find "draw9patch" and open it.....it should open up and you can drag/drop your .png on to it.
That should bring you to the pick below.
Follow directions on pic below and save then quit.
NEVER MIND THE NEXT PIC ISNT THE SAME PNG; PHOTOBUCKET MESSED UP MY TUTORIAL AND I JUST THREW IN THIS PIC. WORKS THE SAME.
BE SURE WHEN YOU USE .9THIS^ YOU DONT TELL IT IT CAN WRITE TEXT ON CURVES AND SUCH (i may have gone to far with my right side/bottom lines) OR THAT IT CAN STRETCH IN A CURVE UNLESS YOU WANT IT TO. ALL WE CARE ABOUT IN HERE IS THE BLACK DOT AT TOP/LEFT AND LINES RIGHT/BOTTOM.
Still not done.
Now open up your extracted file of xcompiler and go in to the folders (just open, not in 7zip):
- example1, res, drawable hdpi and delete everything in there. (its someone else's work....just delete all of it. Make sure you are hitting delete, not backspace.
Drag/drop (or copy paste or whatever) your png there.
- Back out until you see the little droid icon (and both example folders/etc.).
-Click/start the little droid icon.
-When it is done there should be a new folder that is called "done" (imagine that). Go into it and example1 and on until you find your png. Then drag/drop it on your desktop.
-Now open 7zip (or find the one you had open or whatever) and navigate to where we originally got all the pngs....look back at the beginning.
-Then right click/delete your new png....JUST KIDDING.....LOL....
(^If you accidentally deleted it; it's O.K., you needed the practice anyway).
-OK, seriously: drag/drop your new png right into 7zip where we got it from (EXACTLY IN THE SAME FOLDER YOU ORIGINALLY PULLED IT FROM), it will overwrite the old one. AS LONG AS YOU NEVER CHANGED THE NAME OF IT WHILE WORKING ON IT. Tell it yes you want to copy it there or whatever when it asks.
DELETED PIC; FOLLOW WRITTEN DIRECTIONS.
-Close 7zip and tell it "OK".
-Now load like normal and cross your fingers.
Look at that, its red and the chrome looks OK!
DELETED PIC.
Hope this helps someone.
-------------------------------------