Install the app
How to install the app on iOS
Follow along with the video below to see how to install our site as a web app on your home screen.
Note: This feature may not be available in some browsers.
-
After 15+ years, we've made a big change: Android Forums is now Early Bird Club. Learn more here.
You are using an out of date browser. It may not display this or other websites correctly.
You should upgrade or use an alternative browser.
You should upgrade or use an alternative browser.
Root [Revised] Rooting Gingerbread 2.3.5 Dummies Guide
- Thread starter ocnbrze
- Start date
-
- Tags
- htc evo 4g
yes, 3.70 is just a software verhttp://androidforums.com/newreply.php?do=newreply&p=6034627sion and you can change that by flashing a rom.....like mikg
ok if you have root permission then i'm not sure why you are getting that error. have you tried doing the PC36IMG method to get recovery?
I didn't try the PC36IMG method b/c my software is not 4.67.651.1 or 5.07.651.1 like it states in the guide, wasn't sure if that was the right way to go or if I should be doing something else.
Forgive me if I am wrong here, sorry, but as of now you are trying to install Amon Ra recovery correct? Via the PC36IMG way....but cannot because you are on Froyo?
I suppose then, flash MikG3.11 and after that is done, try to change your recovery")
If you're recovery is still CWM, just be sure to wipe wipe wipe wipe wipe and wipe very well before flashing the rom. CWM is kinda buggy when it comes to wiping
Is that the jist of your current state?")
I suppose then, flash MikG3.11 and after that is done, try to change your recovery
If you're recovery is still CWM, just be sure to wipe wipe wipe wipe wipe and wipe very well before flashing the rom. CWM is kinda buggy when it comes to wiping
Is that the jist of your current state?
Forgive me if I am wrong here, sorry, but as of now you are trying to install Amon Ra recovery correct? Via the PC36IMG way....but cannot because you are on Froyo?
I suppose then, flash MikG3.11 and after that is done, try to change your recovery
If you're recovery is still CWM, just be sure to wipe wipe wipe wipe wipe and wipe very well before flashing the rom. CWM is kinda buggy when it comes to wiping
Is that the jist of your current state?
That's it, yep! You give me too much credit though. I'm not sure the best place to go from here.
Is it OK to try the PC36IMG method or is it better to just wipe and flash? Which is safer?
Personally,I would flash mikg and then do t the pc36img thing
You got AmonRA????  Suh-weet!!
Suh-weet!!yeah sorry not replying sooner. you should have been fine to use the PC36IMG method. it only matters with s-on folks. if you have s-off, it should not matter either way.
yeah but it is probably lte and not wimax, so...........
zacharynasty
Well-Known Member
so looks like you took the latest ota for our beloved evo and now you want to root it. to begin with never accept an ota when you are thinking about rooting your phone. this will apply for all phones going forward. with each new ota, rooting will become harder and harder to do.
update:there has been another OTA, software version 5.07.651.1. again like any ota's, you should not have take it. however, if you did, it will not change your hboot version so this guide will still work for you.
first lets make sure that this guide is for you. before we do anything make sure that you have disbaled fastboot. on your phone go to settings>apps>uncheck the fastboot option at the bottom. next you will need to power off then press and hold power+vol down. this will take you to the bootloader screen.
1.if you have hboot 2.18 and it says locked at the top then this guide is for you.
2. if it says hboot 2.16 or 2.15 then use this guide:http://androidforums.com/evo-4g-all...ooting-dummies-guide-gingerbread-edition.html
3.if it says hboot 2.10 or less then use this guide:http://androidforums.com/evo-4g-all-things-root/194918-rooting-dummies.html.
on to rooting
there are now a few different ways you can root your evo and each has their pros and cons. i will try and go into detail with each method and i will leave it up to you to decide which way you want to go.
rooting your phone will wipe all data so make sure that you backup your info accordingly:
1.for contacts make sure that you have them all saved under google. that way when you flash a new rom or even get a new android device, you can sign in to google and all of your contacts will sync to your phone.
2.if you want to backup your sms or even mms text messages then you can use SMS Backup & Restore and it will save them to your sd card.
3.for your apps data, you can use MyBackup Pro. this will pretty much back up everything for you.
please use these methods at your own risk. i do not accept any responsibility if you brick your phone.
ok with that said, here they are:
1. HTCdev method (recommended)
this method is something that htc has done to keep their word on providing us with bootloaders that are not locked down like on some other phones. however, there are some things that you should know about it, if you are planning on going this route. yes the bootloader will be unlocked, but you will have s-on still. however, this also means that the bootloader will be watermarked and this will void your warranty on the phone.
and yes with this method, you will be able to flash roms, kernels and such though you will still have s-on. once the bootloader is unlocked all you need to do is have a custom recovery and either flash a custom rom or flash the su (superuser) file and then you are good to go.
here is an overview of the process:
here is an overview of the process:
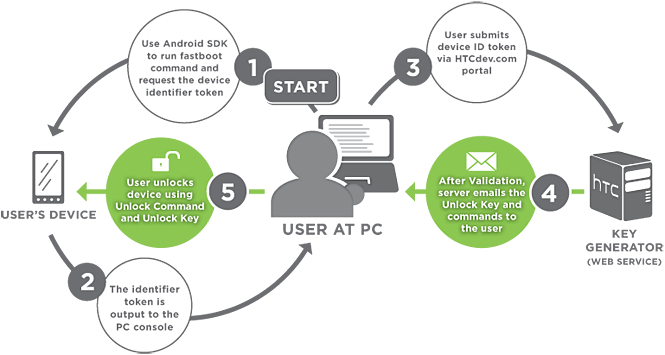
1.go to HTCdev and follow directions to get your bootloader unlocked
2.install custom recovery
3.flash the su file or you can flash a rom of your choice
the setup
you will need to download these files:
make sure that you have htc sync installed and that you have the latest java running.
step 1 HTCdev bootloader unlocker
1.go to the htc website:HTCdev - Unlock Bootloader
2.at the very far right there should be a drop down menu. scroll all the way down to the bottom until you see "All Other Supported Models". do not select the evo 4g(korean). that is an entirely different phone.
3.just follow the steps. and use the files that you downloaded earlier when asked.
4.you will then get an email and follow directions according to the email.
5.congrats!!!!!!!! you have now just unlocked your bootloader
here is a step by step as stated on the htcdev.com site.
1.remove and insert the battery
2.press and hold power+vol down
3.with the vol buttons highlight fastboot and select it with your power button.
4.connect the device to the computer via usb cable
5.create a new folder and call it android
6.download the first three files and save it to the android folder
7.right click on your android folder while holding shift and select open command window here (3rd or 4th option).
8.in the command window type:
9.you will need to copy the long block of text that is displayedCode:fastboot oem get_identifier_token
Right Click > Mark > highlight the block of text > Right click to copy
10.the first line you should highlight should be:
<<<<<Identifier Token Start>>>>>
and end with:
<<<<<Identifier Token End>>>>>
11.paste the text into the token field and then hit submit.
12.you will then get an email with the unlock key and commands to finish the process.
13.once you get the email download the attached .bin file and move to your android folder you created earlier.
14.open the command window (right click+shift, open command window here) and type:15.you will then see a disclaimer just select yes.Code:fastboot flash unlocktoken Unlock_code.bin
CONGRATS!!!!!!!!!!!!!!!!!YOU ARE NOW UNLOCKED!!!!!!
step 2 How to get Recovery
here is a little more details on how to get a recovery onto your phone. there are several ways of doing it. you can use the fastboot command to install recovery or you can use the android flasher program and lastly there is the PC36IMG method. either way, it is pretty simple. i will leave the decision up to you.
various methods to install amon ra 2.3 recovery:
Fastboot method
1.download amon ra 2.3 from here:
PC36IMG_RA_2.3.zip
2.extract the file and then go into and move recovery.img file into the android folder you created when unlocking your bootloader.
3.on your phone after you have unlocked your phone you should be in the bootloader menu screen, select the fastboot option
4.on your computer press and hold shift while right clicking the android folder.
5.select open command window here option (windows 7)
6.enter command:
congrats!!!!!! you have just installed amon ra 2.3Code:fastboot flash recovery recovery.img
android flasher method
Android Flasher, what is this and how do i use this?
well with android flasher, you can flash radios, your splash screen (that is what the htc white screen is called right before sprint's boot animation), and your recovery. you will need to extract the .img file from the .zip file. in this case i will show you how to install a custom recovery amon ra2.3.
so here is what you will need to do:
1.download android flasher from here:
AF Downloader
2.and extract it to someplace on your desktop where you can find it.
3.next you will need to download amon ra 2.3from here:
PC36IMG_RA_2.3.zip
4.extract the img.file and place it some where you will be able to find it.
5.run android flasher
6.go to the recovery slot and select browse and then navigate to the amon ra .img file
7.select it and then select recovery
8.then1 at the very bottom select flash
congrats!!!!!! you now have amon ra 2.3 installed.
here is the original thread for android flasher:
[UTILITY] Android Flasher 2.2.0.5! (12/12/11) - xda-developers
PC36IMG method
this will depend on what software version you are on.
if you have software version 4.67.651.1 download this file:PC36IMG.zip
if you have software version 5.07.651.1 download this file:
PC36IMG_AmonRA-v2.3-hausmod_revA.zip
1.download the PC36IMG for your software version above.
2.rename the file so that it is only PC36IMG. make sure that you do not add any extra .zip's to the name as windows hides extensions by default.
3.transfer the file to the root (that means not in any folder) of the sd card.
4.power off (you most likely need to uncheck fastboot. settings/apps/uncheck fastboot.) then press and hold power+vol down.
5.hboot should see the file and select yes to update.
6.select no to reboot because we want to go into recovery and make a nandroid backup.
7.select recovery.
8.select backup and restore and select backup
9. select the first three and wimax. the other partitions do not need to be backed up. always keep one nandroid backup with wimax keys backed up on your computer.
10.now you can reboot.
11.using a file manager of some sort or even through your computer via usb, you should rename or delete the PC36IMG file on your card. otherwise you will be asked to update every time you go to the hboot screen. you do not need that file any more.
step 3 flash the su file or flash a rom
if you want to just stay on the stock rom, but you want it rooted then here is what you will need to do(not really sure why you would want to as there are many roms that are waaaaaay better then stock. the latest mikg for example is amazing!!!). the su file is not a rom. it allows access to rooted apps to the system partitions.
stay on stock
oryou will need the latest su(superapp) found here:
Superuser-3.0.7-efghi-signed.zip just flash that in recovery and you will have a rooted stock rom:
1.download and move the su file to the root of your sd card that means not in any folder. it just needs to be on your card.
2.go into recovery (power off, make sure fastboot is unabled, and then press and hold power+vol down)
3.select flash zip from sdcard
4.navigate to your su file by using the vol up and down button and select it with the power button.
5.once done, reboot. now you have a rooted stock rom
flash a rom:
1.first you need the vr superwipe (this is not a rom. this is a file that wipes your sytem partitions and also wipes all the temp files as well:ZZZVR_SUPERWIPE.zip. download it and put it on your card. (optional)*
2.download the rom (i recommend MikG v3.11 [3/9/2012]) of your choice and transfer it to your card.
3.go into recovery
4.make a nandroid backup
5.select wipe from the main menu and wipe dalvik cache, cache, and data
6.select flash zip from sdcard
7.find the superwipe file and select it.(optional)
8.find your rom and select it.
9.reboot.
first boot will take a bit longer then normal, so be patient.
2. Captain Throwback's method
ok this method uses the HTCdev method of unlocking the bootloader and flashing the su file so you will need to follow the above method first then you can use captain's guide which is found here:
[GUIDE][WIP] How to achieve S-OFF after unlocking 2.18 HBOOT with HTCDev.com - No More Watermark!
The captain's method will basically get you so that your hboot will be 2.10 with s-on and no watermark (!!!!!!!) which basically will allow you to be able to use unrevoked to get you rooted. this process is a little more involved so please read his guide thoroughly first before attempting it.
once you have downgraded your hboot to 2.10 then you can use this guide to use unrevoked to get you fully rooted:
http://androidforums.com/evo-4g-all-things-root/194918-rooting-dummies.html
if everything went well with unrevoked then CONGRATS!!!!you have successfully rooted your phone.
3. TacoRoot method
This method was brought to my attention thanx to captain throwback. this is not mine and all credit should go to justin case, dan rosenberg, unrevoked and alpharev, and reid holland. here is their main page:TacoRoot - HTC Universal Root Exploit 12-30-2011 - RootzWiki
this method uses a vulnerability in the recovery.log that will provide a temporary root. once you have gain root then all we need to do is downgrade the hboot to 2.10 which would then allow unrevoked to fully root your phone.
please read this method carefully. when you run the taco root commands it will make your phone very unstable and not useable and if you miss the step about usb debugging and setting the phone to charge only then you will need to do the undo command and start over. (a good idea is to print this out before trying this method).
these are the files you will need:
- adb.exe
- fastboot.exe
- AdbWinApi.dll
- flash_image.zip
- mtd-eng.zip
- PC36IMG_SuperSonic_S_Sprint_WWE_3.70.651.1_Radio_2.15.00.11.19_NV_1.90_release_161482_signed
- CunningLogic-TacoRoot-3b6fae6
1.download and install htc sync:HTC Sync 3.0.5551
2.set adb:
on your desktop create a folder called android. and into this folder put the adb.exe, AdbWinApi.dll, and the fastboot.exe files. you will be entering commands from this folder. it is going to be easier if you press and hold shift while right clicking on the android folder and then select open command window here and from there you can enter the commands.
3.download and extract the CunningLogic-TacoRoot-3b6fae6 on to the desktop. move the tacoroot.sh file over to the android folder.
4.we need to extract and then move the flash_image and the mtd-eng files on to the sd card. you can do this while the phone is on and set to disk drive via the usb cable. make sure that you do not put the extracted files in any folders. they need to be on the root of the card (very top level).
5.now we will need to reboot the phone into the stock recovery. power the phone off then press and hold power+vol down to get into the bootloader. on the bootloader menu select recovery. wait until you get the red triangle with an exclamation point. next press and hold both vol up and vol down along with the power button. this will give you the stock recovery menu select the top option to reboot the phone.
6.connect the phone to the pc via the usb cable and make sure that it is in charge only, and make sure that usb debugging is turned on, settings>apps>development>check usb debugging, and lastly that fastboot is disabled, settings>apps>uncheck fastboot. this a very important step. make sure that you do this. if you do not do this or if you skip this step, then when you run the taco root your phone will be very unstable and you will not be able to upgrade your hboot. and you will the need to skip to step 13 to enter the undo command which will return the phone to a more stable state.
7.once the phone is booted up on your pc and in the command window from the android folder enter:
8.Code:adb push tacoroot.sh /data/local/
9.Code:adb shell chmod 755 /data/local/tacoroot.sh
10.the phone should boot up again and in the command window typeCode:adb shell /data/local/tacoroot.sh --setup
your phone will eventually reboot itself. once it does that your phone will be very unstable (most likely it will bootloop), but you will be able to use adb. DO NOT PULL THE BATTERY OUT OR REBOOT. this is normal as the adb commands will still work. just proceed to the next step and pay no attention to the phone. again like i said your phone will be very unstable at this point.Code:adb shell /data/local/tacoroot.sh --root
11.in the command window type:
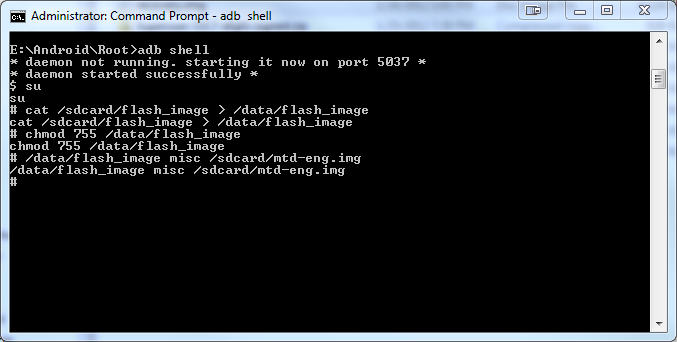
12. ok you should get # in the command window if not then something went wrong. if you do get # then type:Code:adb shell
then:Code:cat /sdcard/flash_image > /data/flash_image
and last:Code:chmod 755 /data/flash_image
the command screen should look like this when all the commands are entered:Code:/data/flash_image misc /sdcard/mtd-eng.img
13.now we need to get the phone stable again. in the command window type:
your phone should now reboot again. now some people have reported that when entering this command an error occurs, "adb not found". if this is the case then close the command window then press and hold shift and right click on the android folder you created earlier. select the open command window here option. the above command should now work.Code:/data/local/tacoroot.sh --undo
14.rename the pc36img_supersonic_s_sprint_wwe_3.70.651.1_radio_2.15.00.11.19_nv_1.90_release_161482_signed file that you downloaded earlier to PC36IMG. do not add an extra zip as windows by default hides extensions.
15.on your phone switch it back to disk drive and transfer the PC36IMG file over to the root of the sd card.
16.power off the phone and then press and hold power+vol down. this will get you to the bootloader. if you named the file correctly and if you have it on the root of the card (not in any folder) then the bootloader should see it and ask you to update. select yes
17.after it is done double check your hboot. it should now be hboot 2.10. you are now ready to use unrevoked!!!!!!!!
18.this is the best guide on rooting with unrevoked:
http://androidforums.com/evo-4g-all-things-root/194918-rooting-dummies.html
19.once unrevoked is finished you should have hboot 2.10 and s-off and no watermark!!!!!!
Hboot 2.18 FAQ'S
1. you do not have to do captain's throwback's guide especially if you plan on staying stock. you can still flash roms and such.
however, if you do not want your hboot watermarked then please follow the captain's guide or the TacoRoot method. but read them first before diving into them.
2.in HTCdev it will ask that you create a folder called android. you will then need to update the Android SDK Tools and Android SDK Platform Tools. once that is done then move the required files (adb.exe, adbWinApi.dll, and fastboot) to the android folder you created. once everything is done and your bootloader is unlocked then make sure that you run the commands in captian's guide from the android folder you created.
3.make sure that you have phone setup as charge only and not as disk drive. this will prevent the phone from being able to mount the sd card, if it is in disk drive mode.
4. i added a new root method called TacoRoot!!!!
5. i will be adding more stuff later.
proceed to the second post for more root info
i know this is old, but it doesent work anymore, the token keeps failing after i post to htc dev site, if theres a better and different way please let me kno hah
i know this is old, but it doesent work anymore, the token keeps failing after i post to htc dev site, if theres a better and different way please let me kno hah
it still works. what method are you trying? htcdev? what exactly does the error say? all the methods still in this guide will work.
new optimus
Android Expert
check your spacing on the code, many times what happens when you copy and paste it a space is put at the front of each line.i know this is old, but it doesent work anymore, the token keeps failing after i post to htc dev site, if theres a better and different way please let me kno hah
zacharynasty
Well-Known Member
check your spacing on the code, many times what happens when you copy and paste it a space is put at the front of each line.
Ok thnks, I tried everything I'm not home now, but when I am ill try again then tell u, it just seems so complicated compared to other phones lol
Ok thnks, I tried everything I'm not home now, but when I am ill try again then tell u, it just seems so complicated compared to other phones lol
curious as to what other phone you are referring to? this is more an htc thing then anything else. this phone used to be pretty easy to root. but as like any other phone, the more updates the phone gets, the harder it is to root it. with each update an exploit usually gets closed up, thus making it harder to do.
so have you tried it again?
zacharynasty
Well-Known Member
curious as to what other phone you are referring to? this is more an htc thing then anything else. this phone used to be pretty easy to root. but as like any other phone, the more updates the phone gets, the harder it is to root it. with each update an exploit usually gets closed up, thus making it harder to do.
so have you tried it again?
Yea I got everything to finally work, command prompts were givin me a problem , I have amon_RA, cyanogenmod 7.2, 2.3.7, but Im about to put on miui ics if it works, but I'm waiting until my sd is done partitioning
Shane37664
Newbie
Hey guys, so far, I've followed the directions for rooting Gingerbread Android, and i now have my phone unlocked. I am now unfortunately stuck on trying to install the flash roms as said in the directions of the guide. i cannot figure out how to move the ZZZVR_SUPERWIPE.zip and MikG-v3.11-signed.zip files to the SD card, and im having a hard time understanding the detailed process on doing all of this with recovery, wiping files, etc..... i could really use some help so i can get back to using my phone like i need to!!
Welcome Shane!!
Glad to see you have rooted your device! Awesome ain't it??!!
So just to check here, you have the custom recovery installed? And are ready to flash MikG, but just unclear on how to move the files to the sd card correct?
When you're booted up into the operating system, and plug your phone into the computer, can you see your sd card? If so, it's just a matter of downloading the files to the computer, and moving them to the sd card.
If I was misunderstanding your post, I am sorry and let me know
Shane37664
Newbie
lol, well, i have yet to be able to explore the freedom of my now finally rooted phone lol, but my issue is being able to find everything.... ive Installed amon ra, i do believe, and im now trying to move the recommended ZZZVR_SUPERWIPE.zip and MikG zip files to the SD card. i just dont know how to navigate anything, or move these files and do the flashes
o.k..so you are at these steps?:
1.first you need the vr superwipe (this is not a rom. this is a file that wipes your sytem partitions and also wipes all the temp files as well:ZZZVR_SUPERWIPE.zip. download it and put it on your card. (optional)*
2.download the rom (i recommend MikG v3.11 [3/9/2012]) of your choice and transfer it to your card.
3.go into recovery
4.make a nandroid backup
5.select wipe from the main menu and wipe dalvik cache, cache, and data
6.select flash zip from sdcard
7.find the superwipe file and select it.(optional)
8.find your rom and select it.
9.reboot.
Shane37664
Newbie
yes, this is exactly where im stuck at lol
ok...let's do this...download the superwipe .zip and MikG .zip to your computer.
Is your phone functioning at the moment?
Is your phone functioning at the moment?
Shane37664
Newbie
yes
and just to verify, i do have the unlocked message, S-ON, HBOOT is 2.18.001 on my bootloader screen
and just to verify, i do have the unlocked message, S-ON, HBOOT is 2.18.001 on my bootloader screen
yes
and just to verify, i do have the unlocked message, S-ON, HBOOT is 2.18.001 on my bootloader screen
o.k...cool
Now download the 2 files to your computer.
While those are being downloaded, plug the Evo into the computer.
When the phone is plugged into the computer, mount it as a usb drive.
(if you don't get a prompt on the phone to do that, pull down the notification bar...there should be an option to mount the device as usb)
Once the device is mounted as usb device, navigate on your computer to the drive letter assigned to the device...such as :E, or :d, or another letter.
Double click on that letter and you will see your sd card contents.....not the device files themselves mind you, just the sd card contents. The only thing that usb can see when mounted are the sd card contents..follow?
If you are not clear on something, just ask, I don't mind
Shane37664
Newbie
ohh, ok, so all the files and contents im seeing in that drive path IS the SD card contents, so i need to move the 2 zip files, unzipped, to the drive path, or SD card?