so then what is being said to me is that i can only go as far as the devo meth thats is it i could not apply to get perment s off with your meth
and my other question that i did as was
if i do the dev meth which you see her below there are sev steps to go threw as well as choices to be mad on which way i should go
so seeing how my wifes phone has this prob what ever it my be which of hte paths do you all recom i do so i wel nto have any other issues
ok with that said, here they are:
1. HTCdev method (recommended)
this method is something that htc has done to keep their word on providing us with bootloaders that are not locked down like on some other phones. however, there are some things that you should know about it, if you are planning on going this route. yes the bootloader will be unlocked, but you will have s-on still. however, this also means that the bootloader will be watermarked and this will void your warranty on the phone.
and yes with this method, you will be able to flash roms, kernels and such though you will still have s-on. once the bootloader is unlocked all you need to do is have a custom recovery and either flash a custom rom or flash the su (superuser) file and then you are good to go.
here is an overview of the process:
here is an overview of the process:
1.go to HTCdev and follow directions to get your bootloader unlocked
2.install custom recovery
3.flash the su file or you can flash a rom of your choice
the setup
you will need to download these files:
make sure that you have htc sync installed and that you have the latest java running.
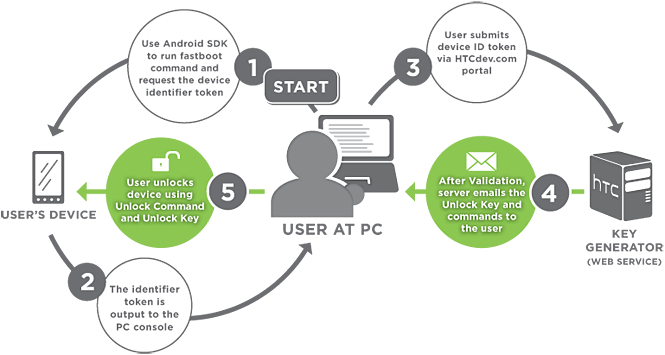
step 1 HTCdev bootloader unlocker
1.go to the htc website:
HTCdev - Unlock Bootloader
2.at the very far right there should be a drop down menu. scroll all the way down to the bottom until you see "
All Other Supported Models".
do not select the evo 4g(korean). that is an entirely different phone.
3.just follow the steps. and use the files that you downloaded earlier when asked.
4.you will then get an email and follow directions according to the email.
5.congrats!!!!!!!! you have now just unlocked your bootloader
 here is a step by step as stated on the htcdev.com site
.
1.remove and insert the battery
2.press and hold power+vol down
3.with the vol buttons highlight fastboot and select it with your power button.
4.connect the device to the computer via usb cable
5.
create a new folder and call it
android
6.download the first three files and save it to the android folder
7.right click on your
android folder while holding shift and select
open command window here (3rd or 4th option).
8.in the command window type:
Code:
fastboot oem get_identifier_token
9.you will need to copy the long block of text that is displayed
Right Click > Mark > highlight the block of text > Right click to copy
10.the first line you should highlight should be:
<<<<<Identifier Token Start>>>>>
and end with:
<<<<<Identifier Token End>>>>>
11.paste the text into the token field and then hit submit.
12.you will then get an email with the unlock key and commands to finish the process.
13.once you get the email download the attached .bin file and move to your android folder you created earlier.
14.open the command window (right click+shift, open command window here) and type: Code:
fastboot flash unlocktoken Unlock_code.bin
15.you will then see a disclaimer just select yes.
CONGRATS!!!!!!!!!!!!!!!!!YOU ARE NOW UNLOCKED!!!!!!
step 2 How to get Recovery
here is a little more details on how to get a recovery onto your phone. there are several ways of doing it. you can use the fastboot command to install recovery or you can use the android flasher program and lastly there is the PC36IMG method. either way, it is pretty simple. i will leave the decision up to you.
various methods to install amon ra 2.3 recovery:
ADB command method
1.download amon ra 2.3 from here:
PC36IMG_RA_2.3.zip
2.extract the file and then go into and move recovery.img file into the
android folder you created when unlocking your bootloader.
3.on your phone after you have unlocked your phone you should be in the bootloader menu screen, select the fastboot option
4.on your computer press and hold shift while right clicking the
android folder.
5.select
open command window here option (windows 7)
6.enter command:
Code:
fastboot flash recovery recovery.img
congrats!!!!!! you have just installed amon ra 2.3
android flasher method
Android Flasher, what is this and how do i use this?
well with android flasher, you can flash radios, your splash screen (that is what the htc white screen is called right before sprint's boot animation), and your recovery. you will need to extract the .img file from the .zip file. in this case i will show you how to install a custom recovery amon ra2.3.
so here is what you will need to do:
1.download android flasher from here:
AF Downloader
2.and extract it to someplace on your desktop where you can find it.
3.next you will need to download amon ra 2.3from here:
PC36IMG_RA_2.3.zip
4.extract the img.file and place it some where you will be able to find it.
5.run android flasher
6.go to the recovery slot and select browse and then navigate to the amon ra .img file
7.select it and then select recovery
8.then1 at the very bottom select flash
congrats!!!!!! you now have amon ra 2.3 installed.
here is the original thread for android flasher:
[UTILITY] Android Flasher 2.2.0.5! (12/12/11) - xda-developers
PC36IMG method
this will depend on what software version you are on.
if you have software version 4.67.651.1 download this file:
PC36IMG.zip
if you have software version 5.07.651.1 download this file:
PC36IMG_AmonRA-v2.3-hausmod_revA.zip
1.download the PC36IMG for your software version above.
2.rename the file so that it is only PC36IMG. make sure that you do not add any extra .zip's to the name as windows hides extensions by default.
3.transfer the file to the root (that means not in any folder) of the sd card.
4.power off (you most likely need to uncheck fastboot. settings/apps/uncheck fastboot.) then press and hold power+vol down.
5.hboot should see the file and select yes to update.
6.select no to reboot because we want to go into recovery and make a nandroid backup.
7.select recovery.
8.select backup and restore and select backup
9. select the first three and wimax. the other partitions do not need to be backed up. always keep one nandroid backup with wimax keys backed up on your computer.
10.now you can reboot.
11.using a file manager of some sort or even through your computer via usb, you should rename or delete the PC36IMG file on your card. otherwise you will be asked to update every time you go to the hboot screen. you do not need that file any more.
step 3 flash the su file or flash a rom
if you want to just stay on the stock rom, but you want it rooted then here is what you will need to do(not really sure why you would want to as there are many roms that are waaaaaay better then stock. the latest mikg for example is amazing!!!).
the su file is not a rom. it allows access to rooted apps to the system partitions.
stay on stock
you will need the latest su(superapp) found here:
Superuser-3.0.7-efghi-signed.zip just flash that in recovery and you will have a rooted stock rom:
1.download and move the su file to the root of your sd card that means not in any folder. it just needs to be on your card.
2.go into recovery (power off, make sure fastboot is unabled, and then press and hold power+vol down)
3.select flash zip from sdcard
4.navigate to your su file by using the vol up and down button and select it with the power button.
5.once done, reboot. now you have a rooted stock rom
or
flash a rom:
1.first you need the vr superwipe (
this is not a rom. this is a file that wipes your sytem partitions and also wipes all the temp files as well:
ZZZVR_SUPERWIPE.zip. download it and put it on your card.
(optional)*
2.download the
rom (i recommend
MikG v3.11 [3/9/2012]) of your choice and transfer it to your card.
3.go into recovery
4.make a nandroid backup
5.select wipe from the main menu and wipe dalvik cache, cache, and data
6.select flash zip from sdcard
7.find the superwipe file and select it.
(optional)
8.find your rom and select it.
9.reboot.
first boot will take a bit longer then normal, so be patient.


.gif)


")